
The Data Export screen turns a query — one entity, your choice of fields, optional fields from related records, filters and sorting — into an Excel or CSV file produced by a background job. You build and preview the query in the Start Export wizard, submit the job, and download the result from Export History while the file is still stored. The screen is meant for administrators: it exports the tenant's data as it is, not as filtered by the exporting user's record permissions.
Prerequisites
- The data-export capability (
setup.data.export.manage) on one of your security profiles. It gates the Data Export navigation item and every export endpoint. - Awareness that export does not apply record-level or field-level security. The job applies your organization's tenant boundary and the metadata visibility of entities and fields, nothing else: every record of the entity, and any field you tick, lands in the file regardless of sharing rules or field permissions. Treat the capability as a data-administration grant and the output as sensitive.
- A plan for where the file goes. Files are kept for 7 days and then deleted; the history row stays.
Procedure
Step 1 — Open Data Export and pick the entity
Go to Setup → Platform Operations → Data Export. The page body is the Export History table; the only action is Start Export in the page header, which opens a five-step wizard: Entity → Columns → Sort & Filter → Records → Preview. On the first step choose the entity in the searchable Select an entity to export… list — every non-hidden entity is offered. The entity is the query's fixed starting point: related fields can be added in the next step, but unrelated entities need separate export jobs. Next stays disabled until an entity is selected; Reset at the bottom-left clears the wizard at any step.
Step 2 — Choose the columns
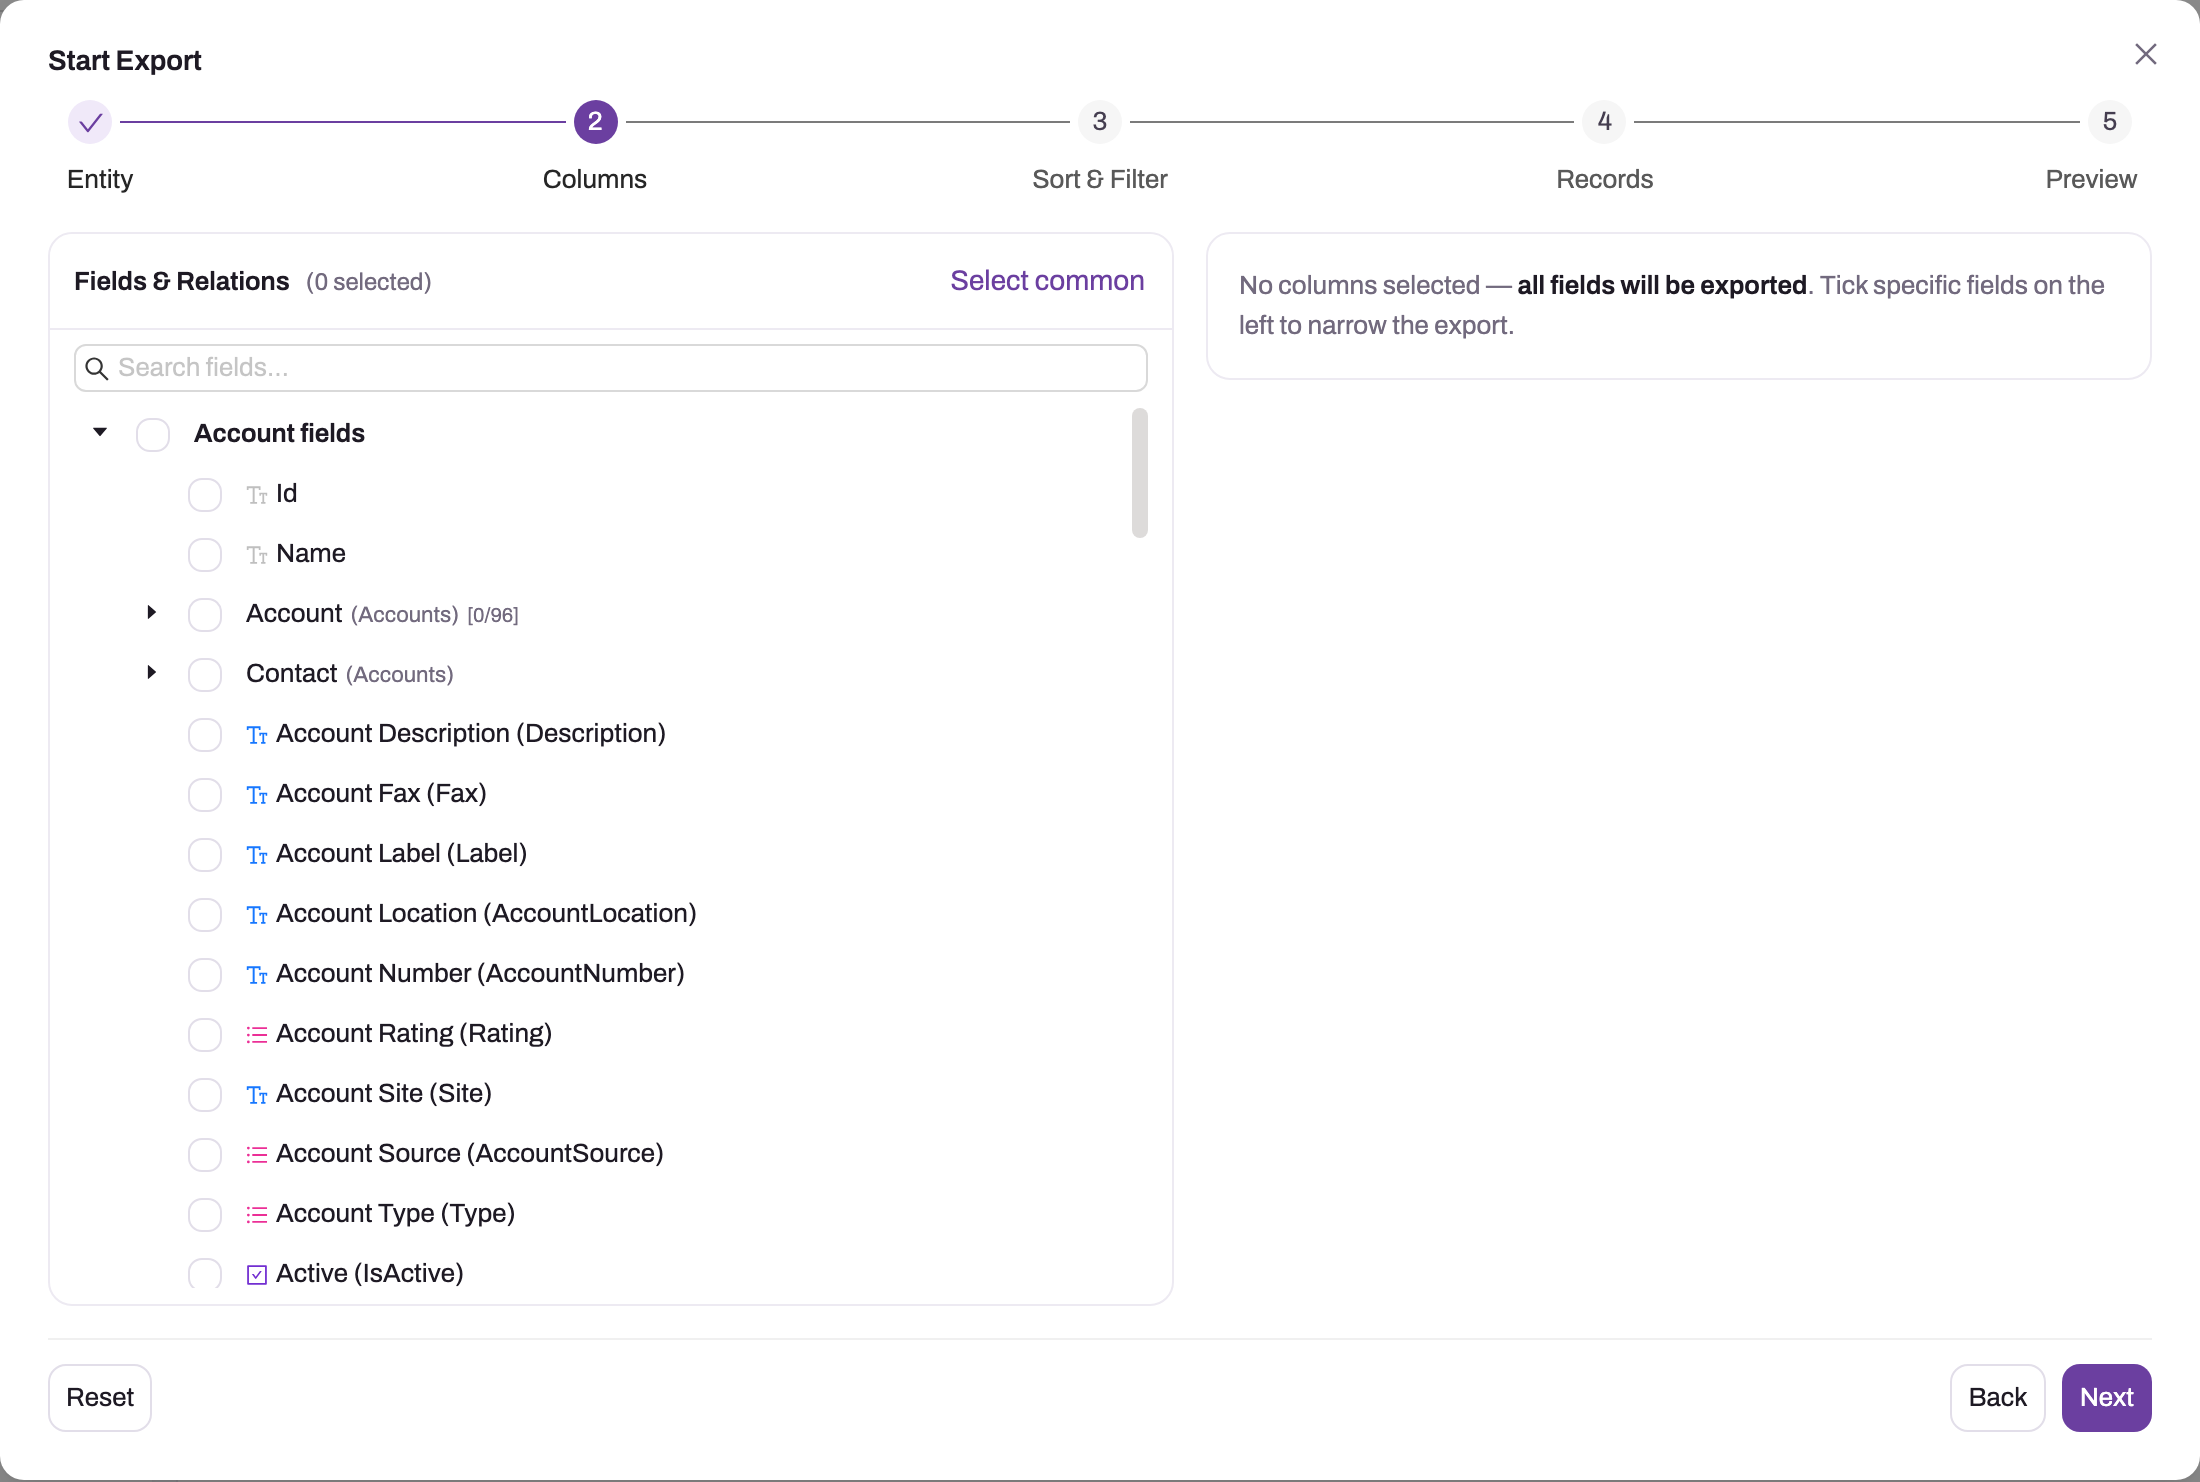
- 1
The five steps run Entity, Columns, Sort & Filter, Records, Preview; Back and Next move between them.
- 2
Select common ticks Name plus every non-system, non-lookup field in one click.
- 3
Relations expand to the parent's or children's fields; ticked related fields become Prefix.Field columns.
- 4
Tick individual fields to narrow the export; the count next to Fields & Relations tracks the selection.
- 5
With no columns selected all fields are exported; selected fields appear here as chips you can drag to set column order.
- 6
Next carries the selection to Sort & Filter; Reset clears the whole wizard.
The Fields & Relations card lists the entity's fields and, below them, its relations — parents reached through lookups (marked ↑) and child collections (marked ↓) — each expandable to a further level so that an order export can carry its account's name or its owner's e-mail. Tick fields to include them; Select common ticks the Name field plus every non-system, non-lookup field; Search fields… filters the tree. The Selected Fields card on the right lists what you ticked as chips you can drag to set the output column order. Nothing ticked means all fields will be exported, which is rarely what a recipient needs — narrow the export here rather than in the spreadsheet afterwards. Related fields appear in the file as Prefix.Field columns.
Step 3 — Filter and sort
The Sort & Filter step has two tabs. Filter rows (Add filter) pair a field — including related fields of the relations you ticked — with an operator: Equals, Not equals, Contains, Starts with, Ends with, Greater than, Greater or equal, Less than, Less or equal, Is null, Is not null. Picklist fields offer their values in a dropdown. Sort rows (Add sort) pick a field and an optional Descending flag. Sorting matters more than it looks: when you cap the record count in the next step, the sort decides which rows survive.
Step 4 — Set the record limit and file format
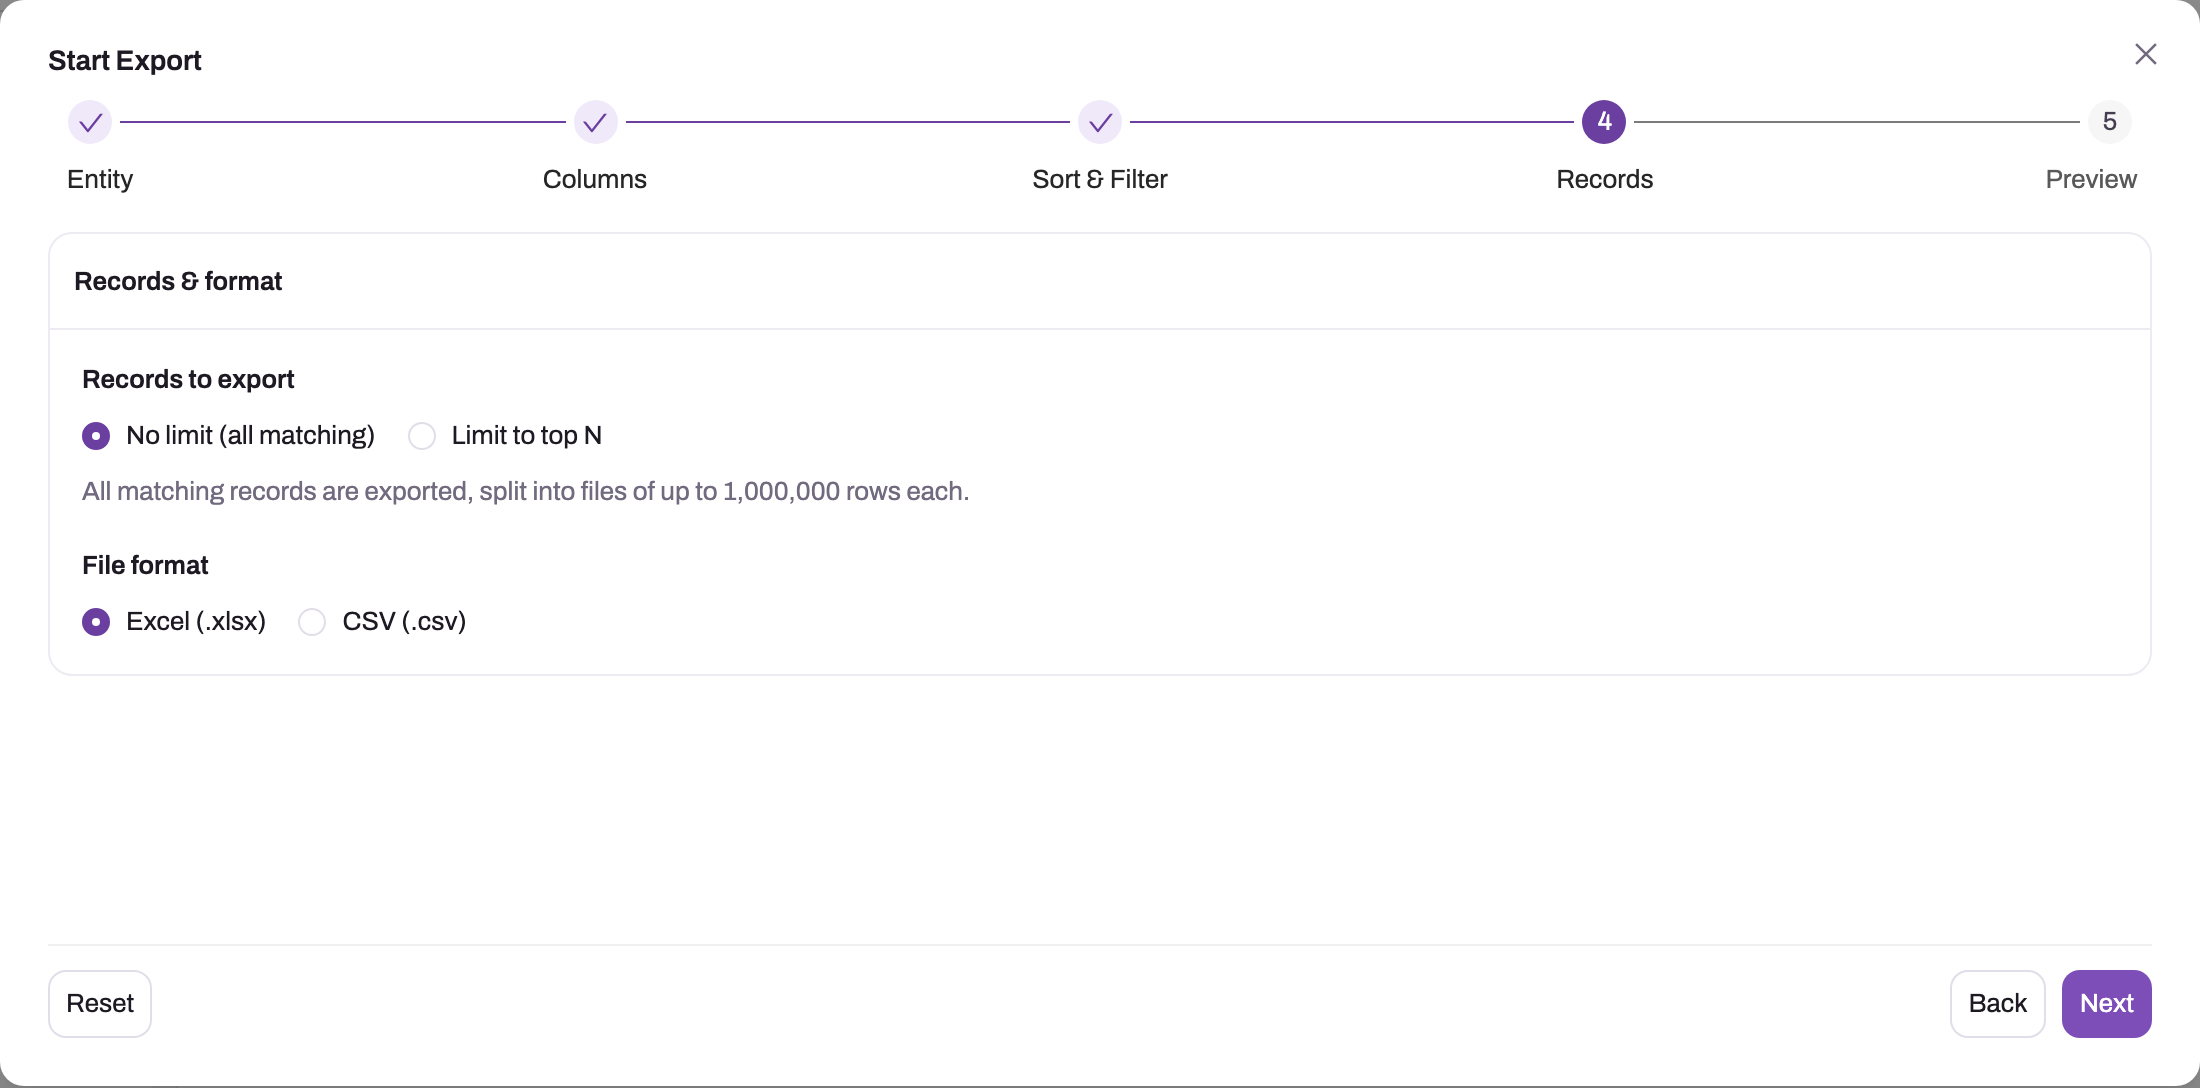
- 1
No limit exports every matching record, split into files of up to 1,000,000 rows each.
- 2
Limit to top N keeps only the first N rows in the sort order set on the previous step, so sort before you cap.
- 3
Excel gives a bold, frozen header row with autofilter; CSV gives a UTF-8 file with a header row.
- 4
Preview follows: it runs the real query and shows the exact row count before you submit.
- 5
Next opens Preview; Submit export appears only on the last step.
Records to export is either No limit (all matching) — every matching record, split into files of up to 1,000,000 rows each — or Limit to top N, a row cap applied in the chosen sort order (default 100,000). File format is Excel (.xlsx) (default) or CSV (.csv). There are no further output options: headers, date format and time zone are fixed (see the format notes below), and attachments are never included.
Step 5 — Preview and submit
Preview runs the real query against live data: choose a sample size of Top 10, 25 or 50 and use Refresh preview after changing anything. The Export Lines table shows the sample with the exact column headings the file will carry; the Exporting {n} rows counter is an exact count over the same filter, so compare it with your expectation before you commit. Id cells link to the records for spot checks. When the sample is right, select Submit export. The wizard closes with an Export queued message and the job id, and a new row appears at the top of Export History as Queued.
Step 6 — Download from Export History
Export History shows Job ID (short form, copyable), Status, Entity, Format, Rows, File, Expires, Submitted and Submitted By, and refreshes itself every five seconds while a job is Queued, Published or Processing. A job normally moves Queued → Processing → Completed; Failed carries the reason in a tooltip on the File cell. Once Completed, the File cell offers Download for a single file, or a ZIP (n) dropdown listing each part as Part n · rows for exports that were split. The Expires column shows when the stored file is removed — 7 days after the job — after which only the history row remains. Downloads are authenticated: the link works only for signed-in users holding the export capability, so share the file, not the link.
Expected result: the history row reads Completed with a Rows count matching the preview counter, every part downloads, and a spot check of the file shows the columns, filters and order you previewed.
Format notes
| Format | What you get |
|---|---|
| Excel (.xlsx) | One worksheet per file, bold header row frozen at the top, autofilter enabled, uniform column width, header captions in the form Label (FieldName). |
| CSV (.csv) | A header row followed by the data, UTF-8 with byte-order mark (opens correctly in spreadsheet tools), dates as yyyy-MM-dd HH:mm:ss. |
Both formats carry identical rows and columns for the same query. Choose CSV when the file feeds a script, another system or a later re-import; choose Excel when people will read or hand-edit it.
Limits
- Files are split at 1,000,000 rows; a job may produce at most 20 files. A query that would exceed that ceiling fails before any file is written, with a message asking you to narrow the filter or set a record limit.
- The preview and the count run with a 30-second query timeout. A preview that times out usually means a broad filter on a very large entity — add a filter or a sort on an indexed field.
- Some entities can be blocked from export by platform configuration; they simply do not appear in the entity list.
- Submitting the same wizard state twice within a short interval returns the existing job rather than starting a duplicate.
- If your platform's export feature or file storage is disabled, Submit export fails with a service-unavailable error; this is an operator configuration matter, not a permissions problem.
Common problems
- The file contains records or fields users cannot see in the app. Expected: exports apply tenant isolation and metadata visibility only, not record-level sharing or field-level security. Restrict who holds
setup.data.export.manage, and narrow the columns and filters instead of relying on security to trim the file. - The job failed immediately with a "narrow the filter" message. The result would have exceeded 20 files (about 20 million rows). Add a filter, or set Limit to top N.
- The download link no longer works. The file passed its Expires time and was deleted. Run the export again — the history row cannot revive a file.
- A colleague's link does not open for me. Downloads are authenticated and require the export capability. Pass the downloaded file, not the link.
- One export produced a ZIP with several parts. That is the 1,000,000-row split, not an error; each part has its own header row.
Common questions
Can I export several entities in one file?
One entity drives each export, but the Columns tree lets you pull fields from related records — parents through lookups and children through collections, each expandable a further level — flattened onto each row as Prefix.Field columns. For genuinely separate data sets, run one export per entity. If you are exporting to re-import elsewhere, keep each entity in its own file anyway, since imports also work one entity at a time.
Does the export respect my sharing rules and field permissions?
No. The export applies the organization boundary and entity/field visibility from metadata, and nothing else — every record of the entity and every ticked field is written. This is why the capability is a setup-level grant rather than a per-user permission. If you need a user-scoped extract, filter it explicitly in Sort & Filter and review the preview.
How do I get record ids for a later import?
Tick Id in the Columns step (it is offered as a normal field). An import that carries an id column updates the matching records instead of creating duplicates, so export-edit-import is the safe way to bulk-update.
Can I schedule a recurring export?
Not from this screen; every export is a one-off background job started from the wizard. For a recurring extract, re-run the wizard when needed, or use a report subscription for a recurring, formatted delivery of a query.