
The delivery order is the document that travels with the goods: it carries the customer, the billing/shipping/delivery addresses, the lines being dispatched, and the transport details. It is usually created from a fulfilment document (Picked Delivery or Allocation Delivery — see Fulfilment picking), and can also be released directly from an order or an invoice. On the delivery order itself, the warehouse runs the dispatch actions this page covers: populating the checklist, releasing the shipment, and creating the invoice.
Prerequisites
- A delivery order with lines — typically created from confirmed picked lines on the fulfilment document.
- For the checklist step: a delivery checklist template defined by your administrator (see the configuration reference).
- For Release Shipment: a customer account that is linked to a branch — this action serves deliveries whose receiving party also receives in xMatix.
Procedure
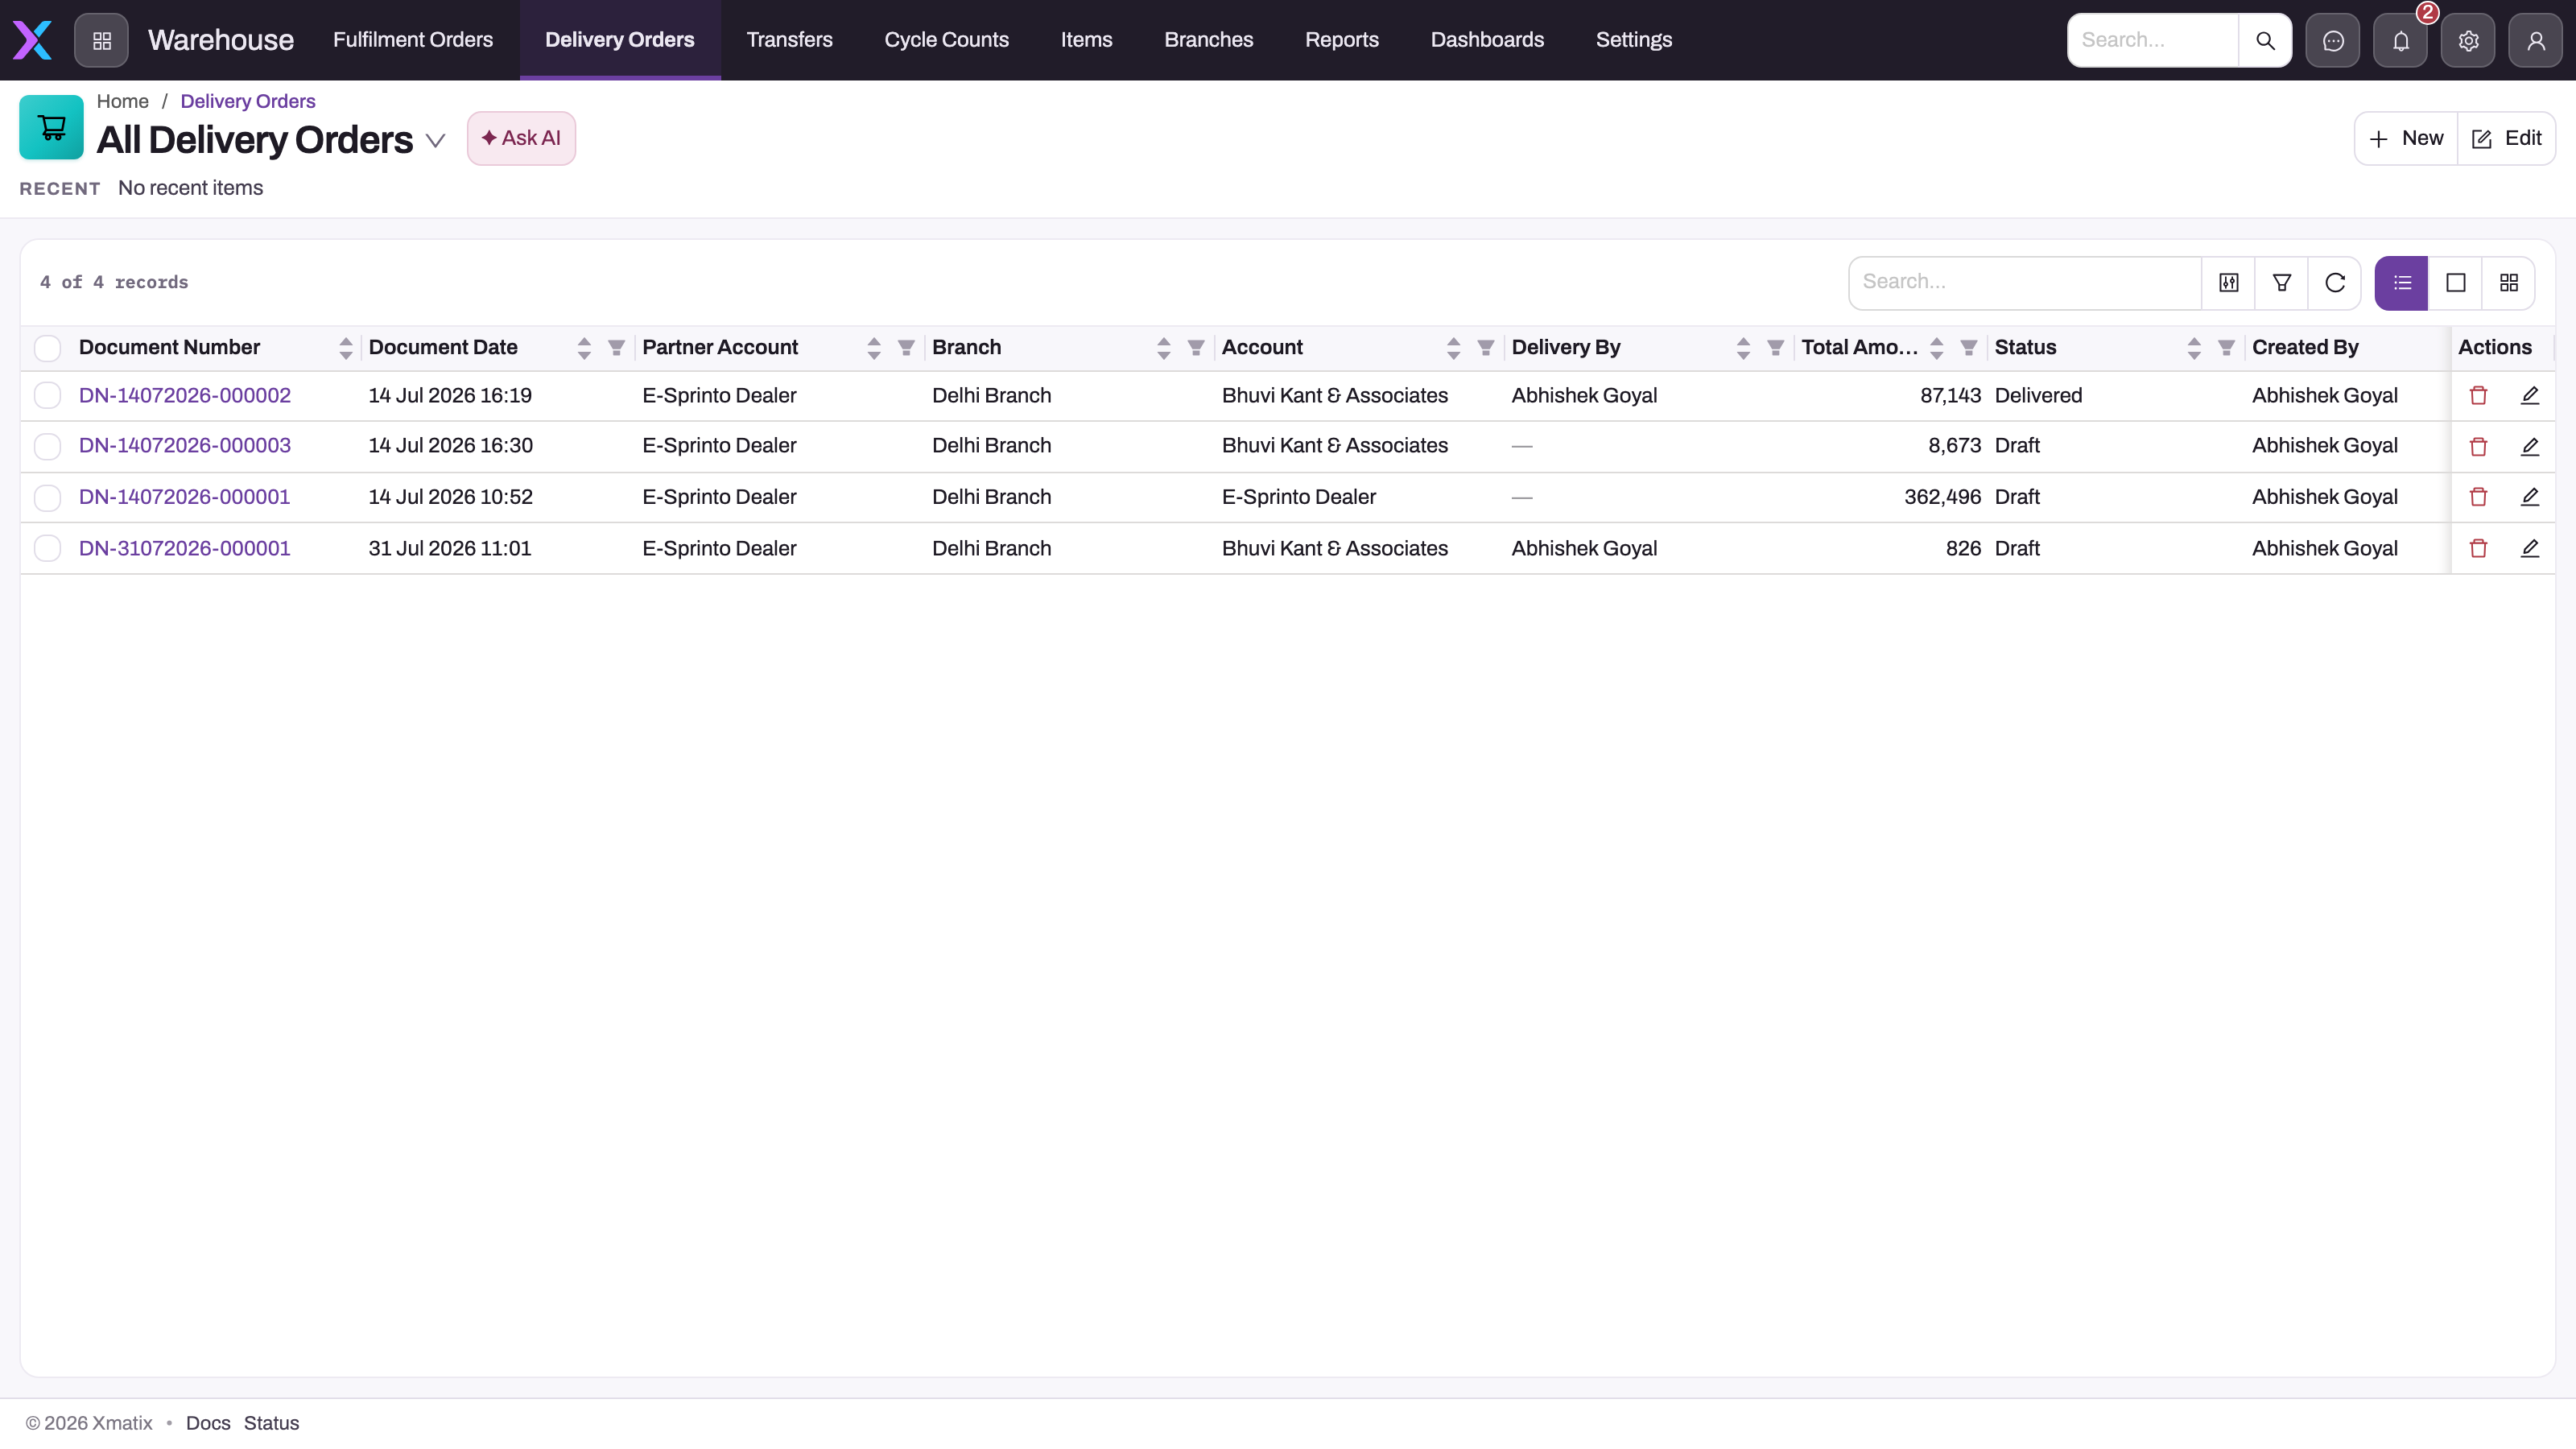
Delivery orders are a fixed tab of the Warehouse app (Delivery Orders, default view All Delivery Orders); the same list is reachable from the Sales app.
- 1
Delivery Orders is a fixed tab of the Warehouse app.
- 2
Document Number (DN-…) opens the delivery order; numbering comes from the document numbering setup.
- 3
Account is the receiving customer; Release Shipment only works when this account is linked to a branch that receives in xMatix.
- 4
Delivery By is the resource responsible for the hand-off — empty until someone is assigned.
- 5
Total Amount is computed from the lines because the delivery order can be the basis of the invoice.
- 6
Status is a picklist your process maintains (Draft and Delivered here); the record's own flags — Shipment Released and the posting flags — are what the dispatch actions set.
Start from the row created by the fulfilment, order or invoice you are dispatching. A document created upstream arrives with its account, lines, amounts and addresses populated; creating a second header by hand is not a remedy for a source document that has not released correctly. When you do create one manually (New), the form has a header — Partner Account, Branch, Account, Invoice, Delivery By, Document Date — and four tabs:
| Tab | Fields | What they are for |
|---|---|---|
| Delivery Dates | Requested Delivery Date, Requested Delivery Time Slot, Scheduled Delivery Date, Delivery Date | Requested (what the customer asked for, optionally a branch time slot), scheduled (what the warehouse plans) and actual delivery dates are kept apart so promise and performance stay comparable. |
| Delivery Address | Delivery Address (contact address lookup), Street, City, State, Postal Code, Country | The hand-off site. It is independent of billing. |
| Billing Address | Billing Address (contact address lookup), Delivery Location, City, State, Country, Postal Code | The invoicing geography; it may legitimately differ from the delivery address and drives tax on the invoice created in Step 5. |
| Additional Details | Discount Group, Price List, Tax Supply Type (defaults to Within State), Service Order | Commercial controls inherited by the invoice, plus the service-order source when the delivery fulfils service work. |
Step 1 — Review the document
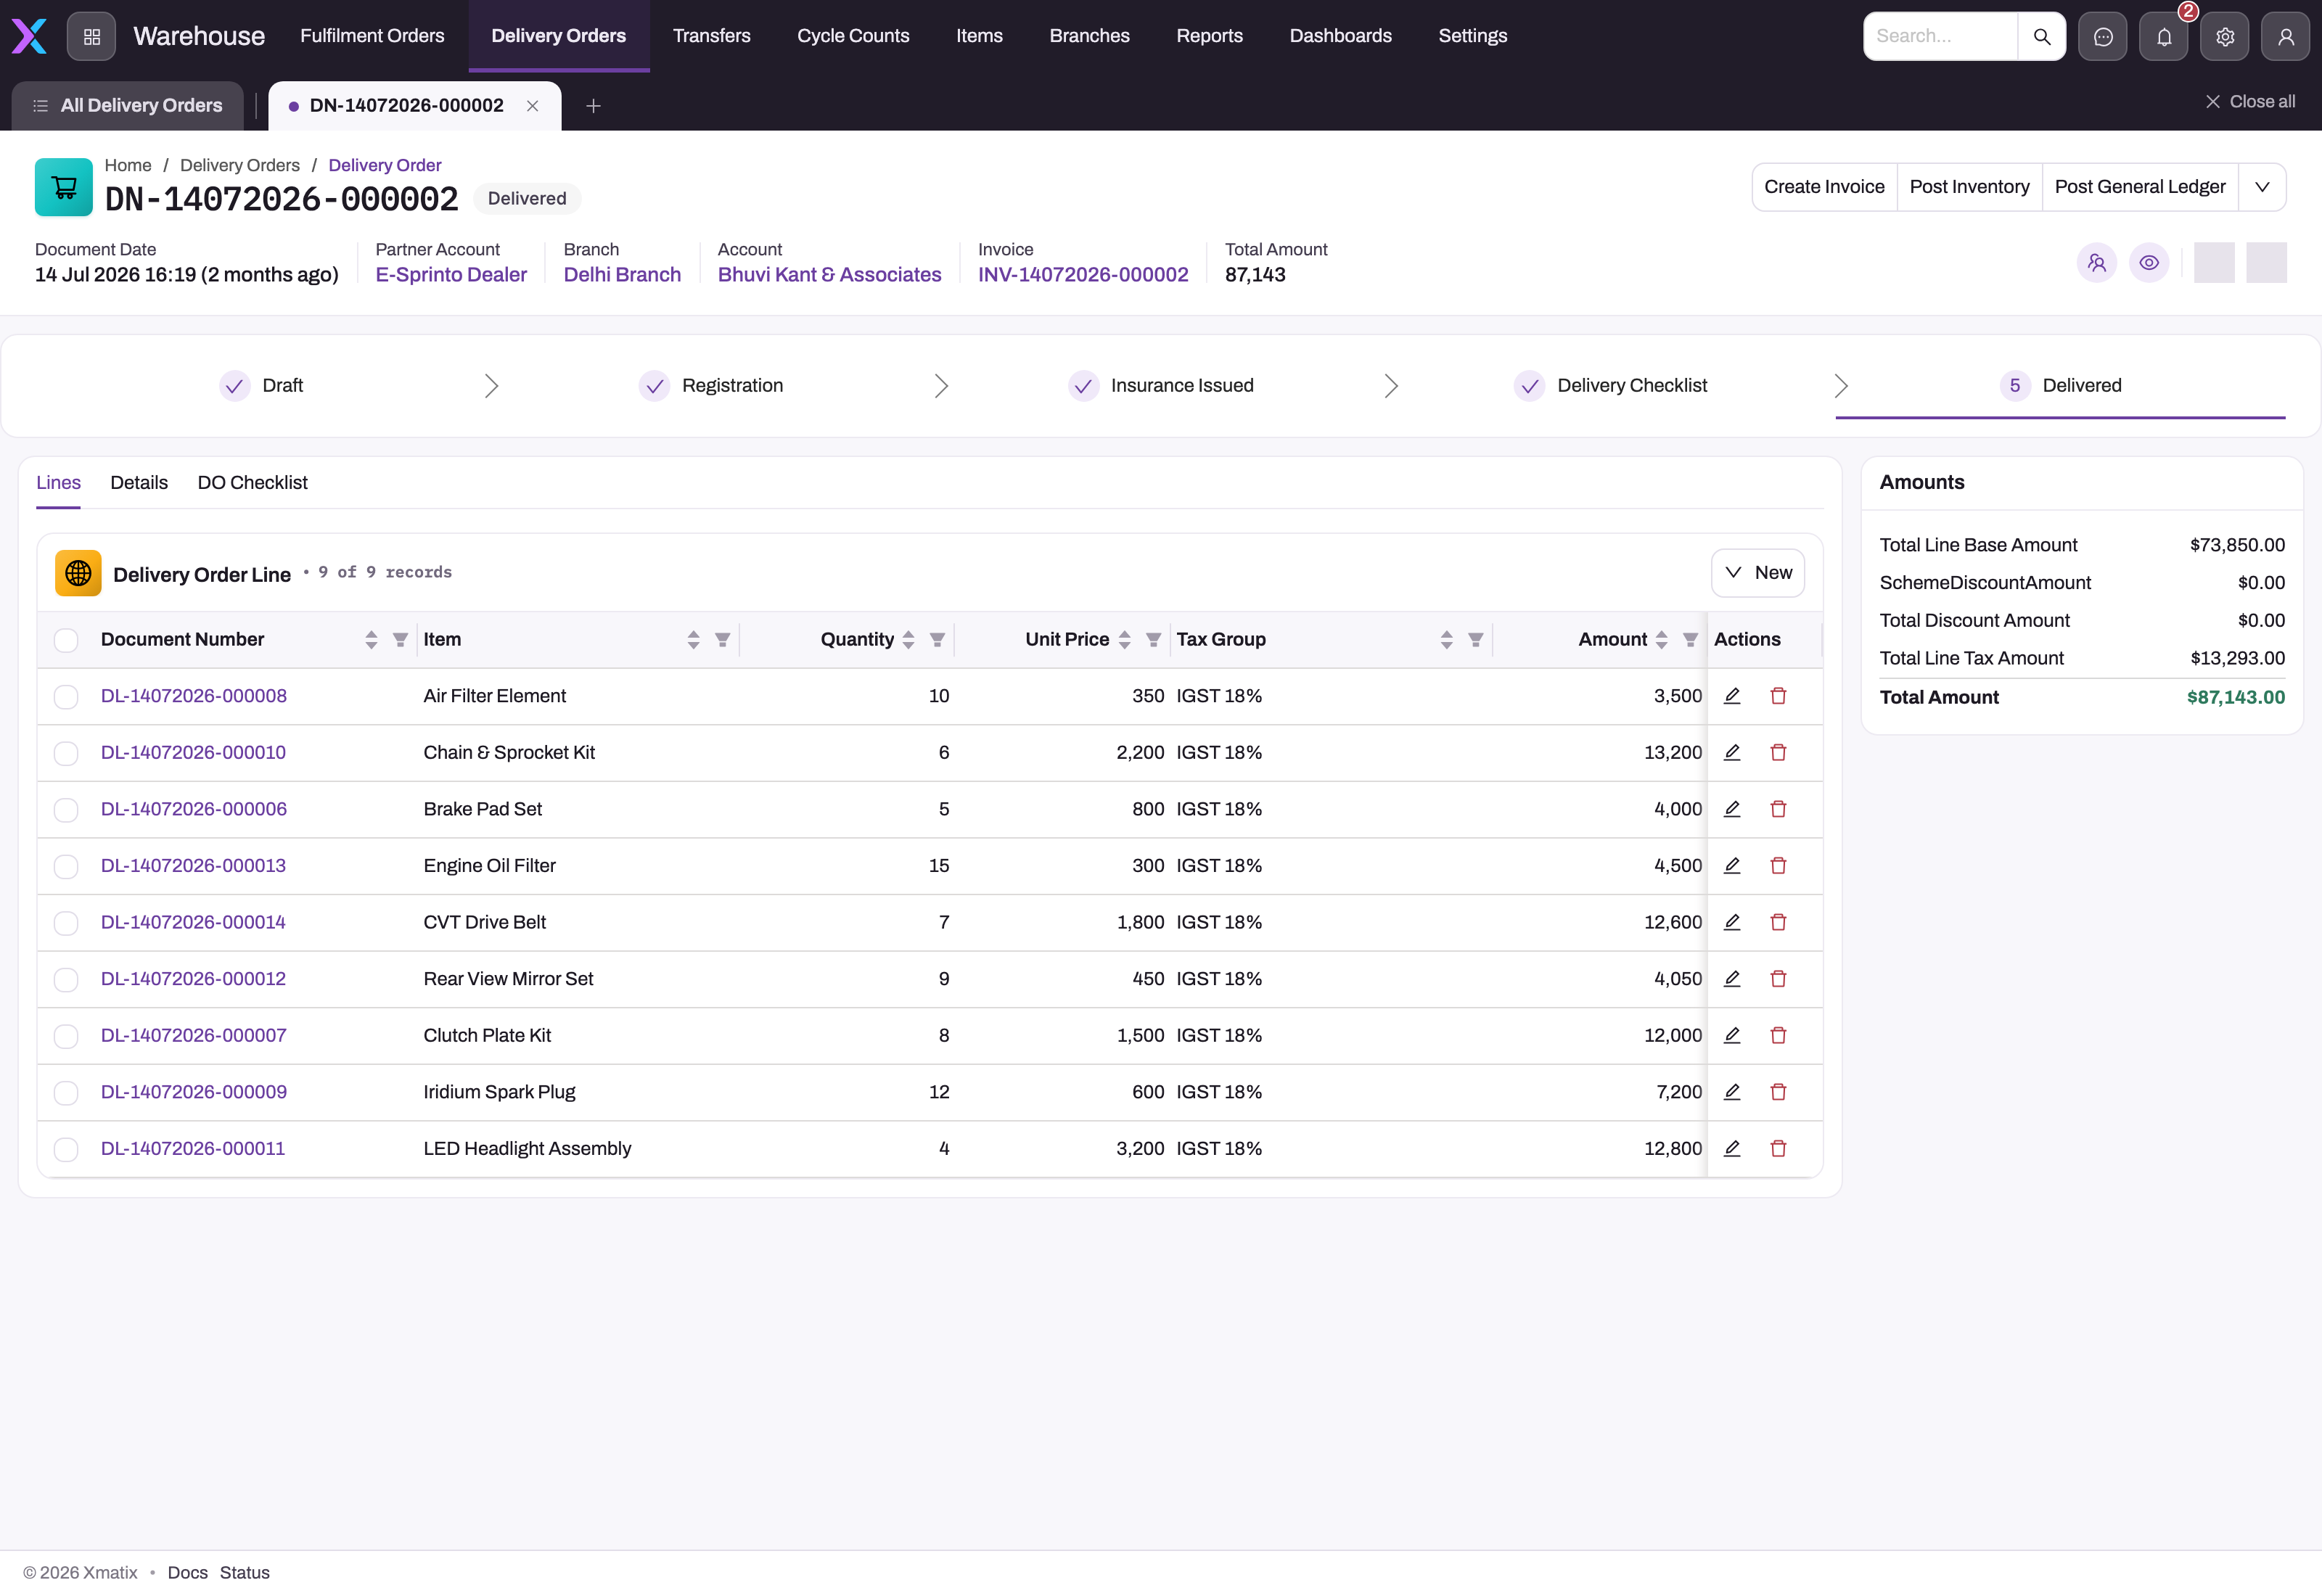
Open the delivery order. The header strip shows partner account, branch, customer account, linked invoice and total; the stage bar below it shows the status pipeline configured for your tenant; the Amounts panel carries base, discount, tax and total computed from the lines, since the delivery order can be the basis of the invoice in Step 5. The header actions — Create Invoice, Post Inventory, Post General Ledger and, behind the arrow, Populate Checklist, Release Shipment and E-Way Bill — are the dispatch actions this procedure runs. Check the lines (item, lot, quantity, storage location they were picked from), the delivery and billing addresses, and the requested and scheduled delivery dates.
- 1
Header strip: status badge, partner account, branch, receiving account, the linked invoice and the total.
- 2
Dispatch actions: Create Invoice, Post Inventory, Post General Ledger; the arrow holds Populate Checklist, Release Shipment and E-Way Bill.
- 3
Delivery Order Line count — nine lines here, one per item picked or allocated on the source fulfilment.
- 4
Quantity is what this dispatch carries; open a line (DL-…) for the lot, storage location and pending-invoice quantity behind it.
- 5
Unit Price, Tax Group and Amount are carried per line because Create Invoice bills from these lines.
- 6
Amounts: base, scheme and other discounts, tax and total computed from the lines.
Use the saved Lines tab to verify exactly which items and quantities are on this dispatch; the grid shows item, quantity, unit price, tax group and amount per line, and opening a line shows the lot, storage location and pending invoice quantity behind it. Partial delivery is normal, so compare the rows with the source rather than inferring completeness from the header.
Step 2 — Populate the checklist
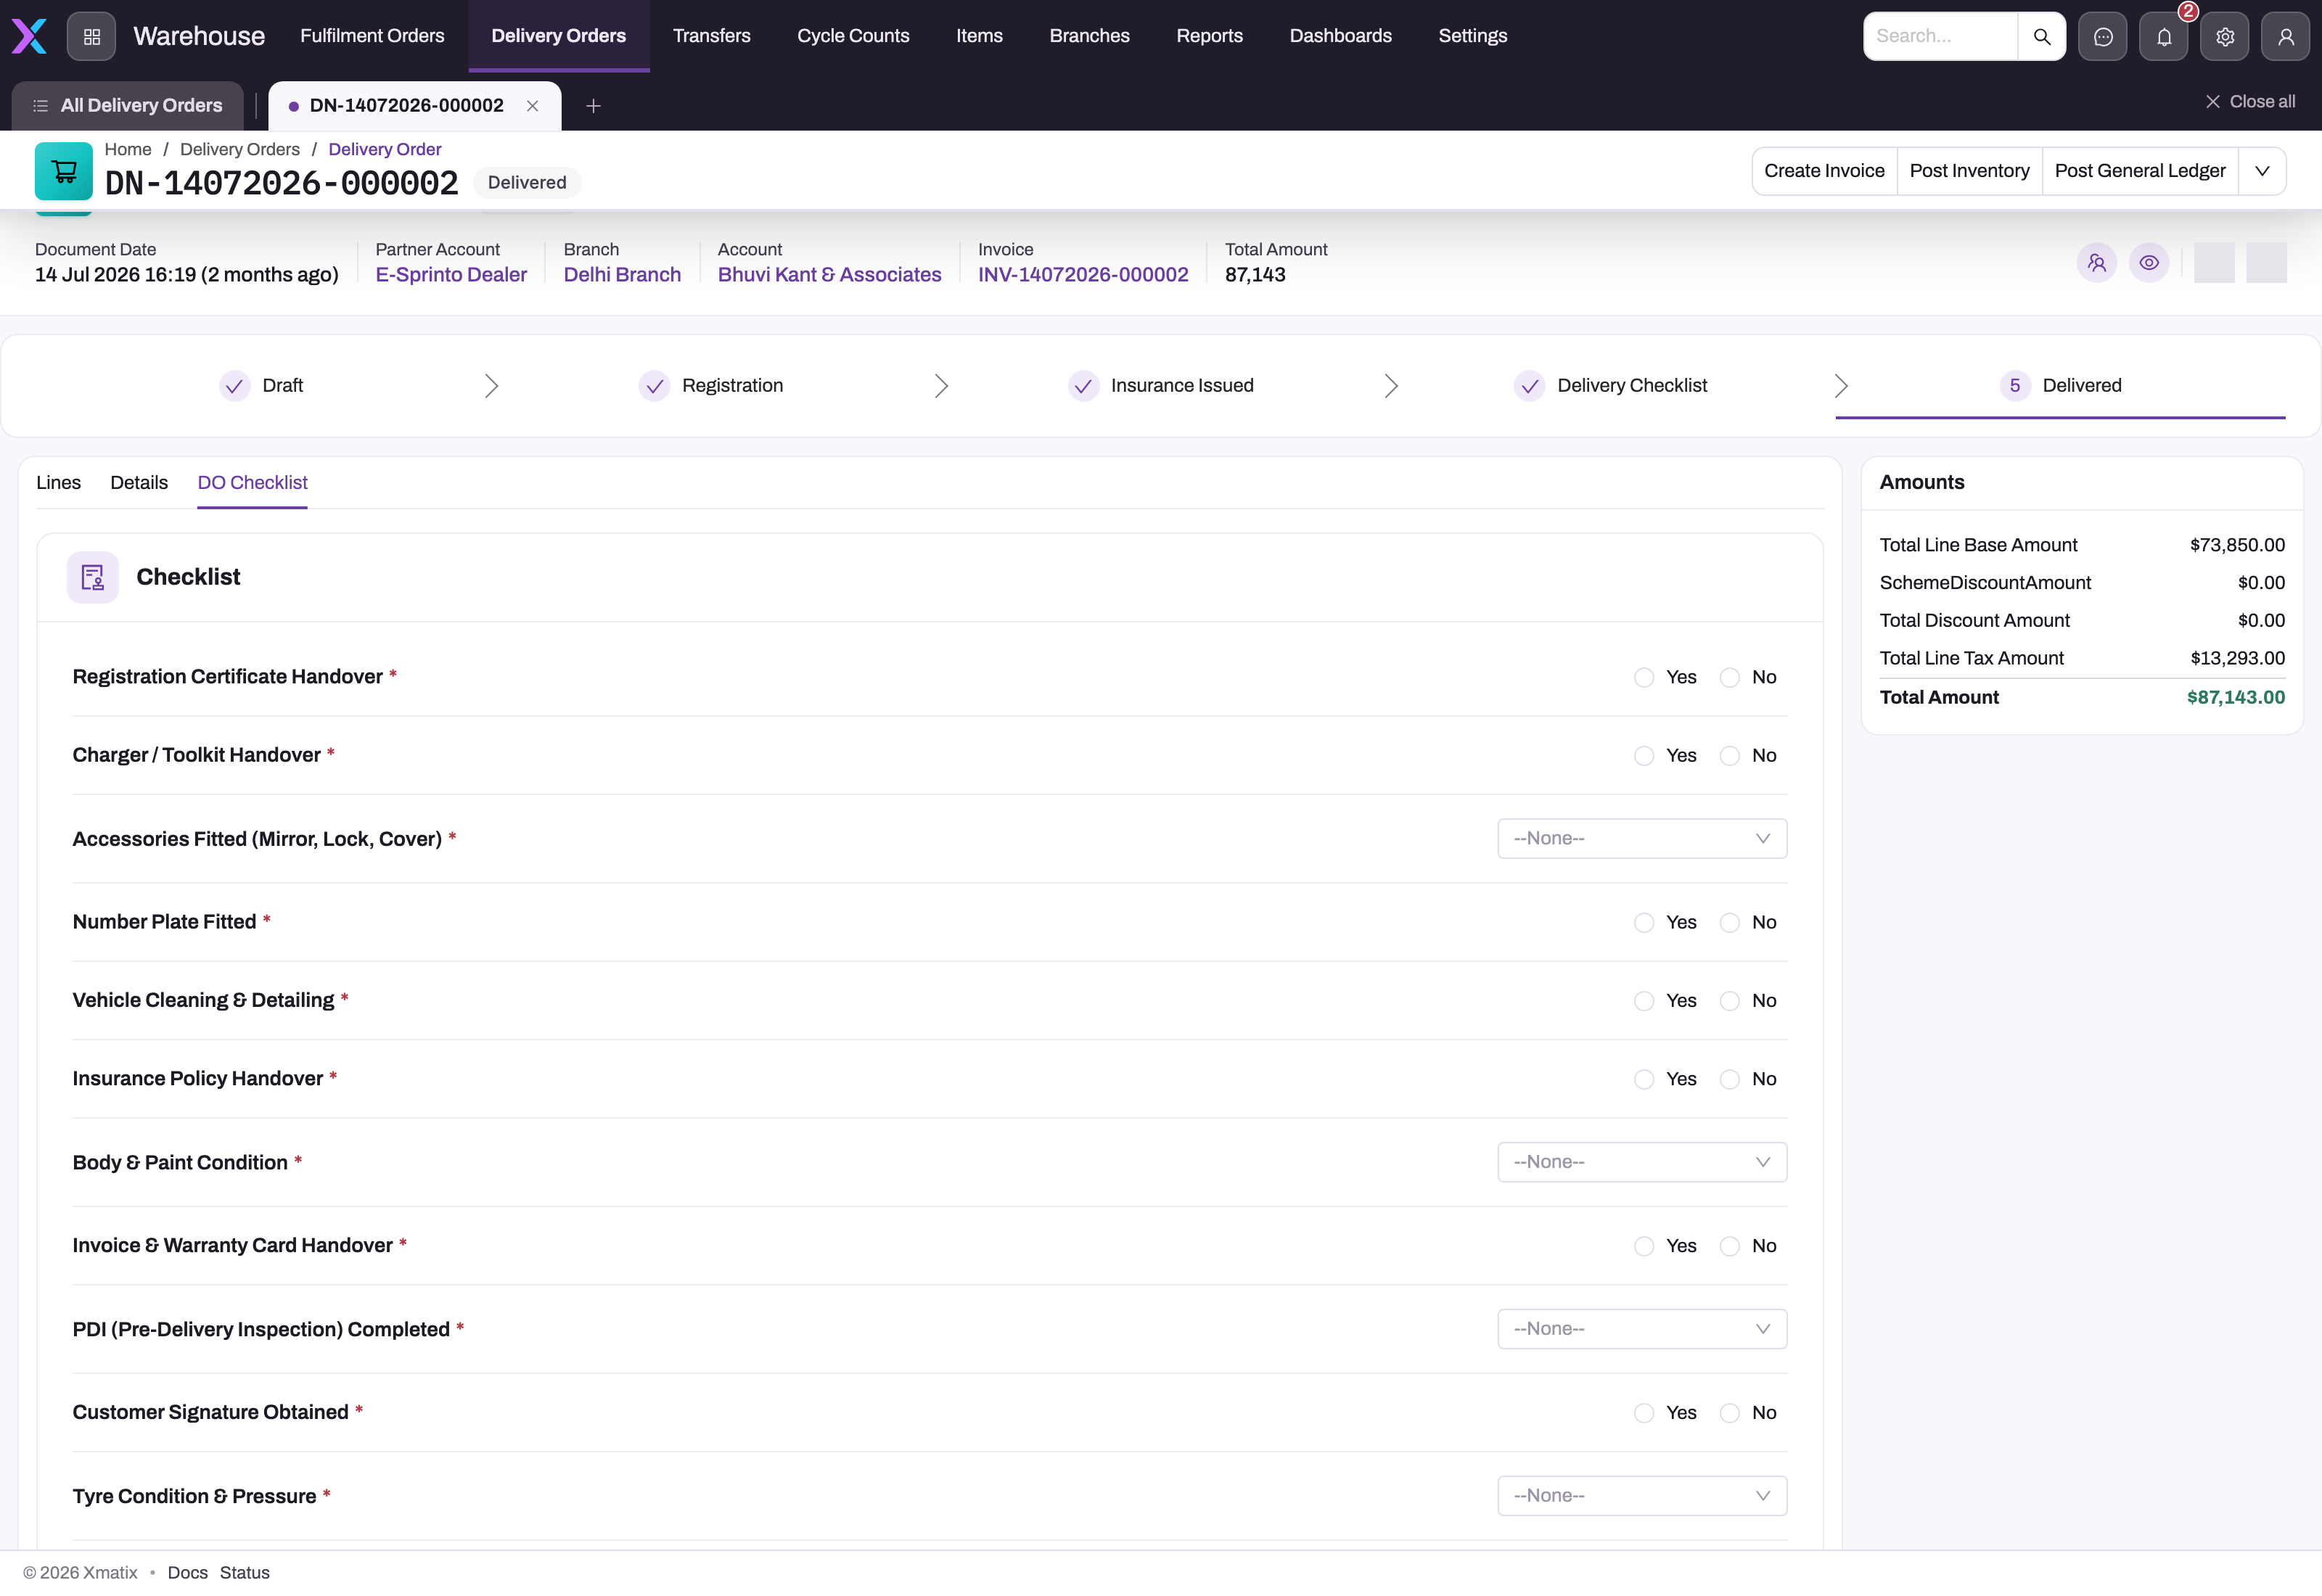
Run Populate Checklist. It copies every line of the delivery checklist template onto this document as checklist items — the checks your process requires before goods leave, each with its own data type for the answer. If nothing appears, no delivery checklist template is defined; the action creates nothing rather than failing.
- 1
DO Checklist sits beside Lines and Details on the saved document.
- 2
Every row is one template line copied onto this delivery order by Populate Checklist — the template, not the warehouse, decides which checks appear.
- 3
Yes/No items are answered with radios; the red asterisk marks items the template made mandatory.
- 4
Picklist items (–None– until answered) come from the template line's data type.
- 5
Run Populate Checklist from the header actions (behind the arrow) before the goods leave; it creates nothing if no template is defined.
The DO Checklist tab is the record of those copied checks and their completion state. Confirm the expected template lines exist and are resolved before release; a blank tab usually points to missing applicable template configuration.
Step 3 — Record transport details
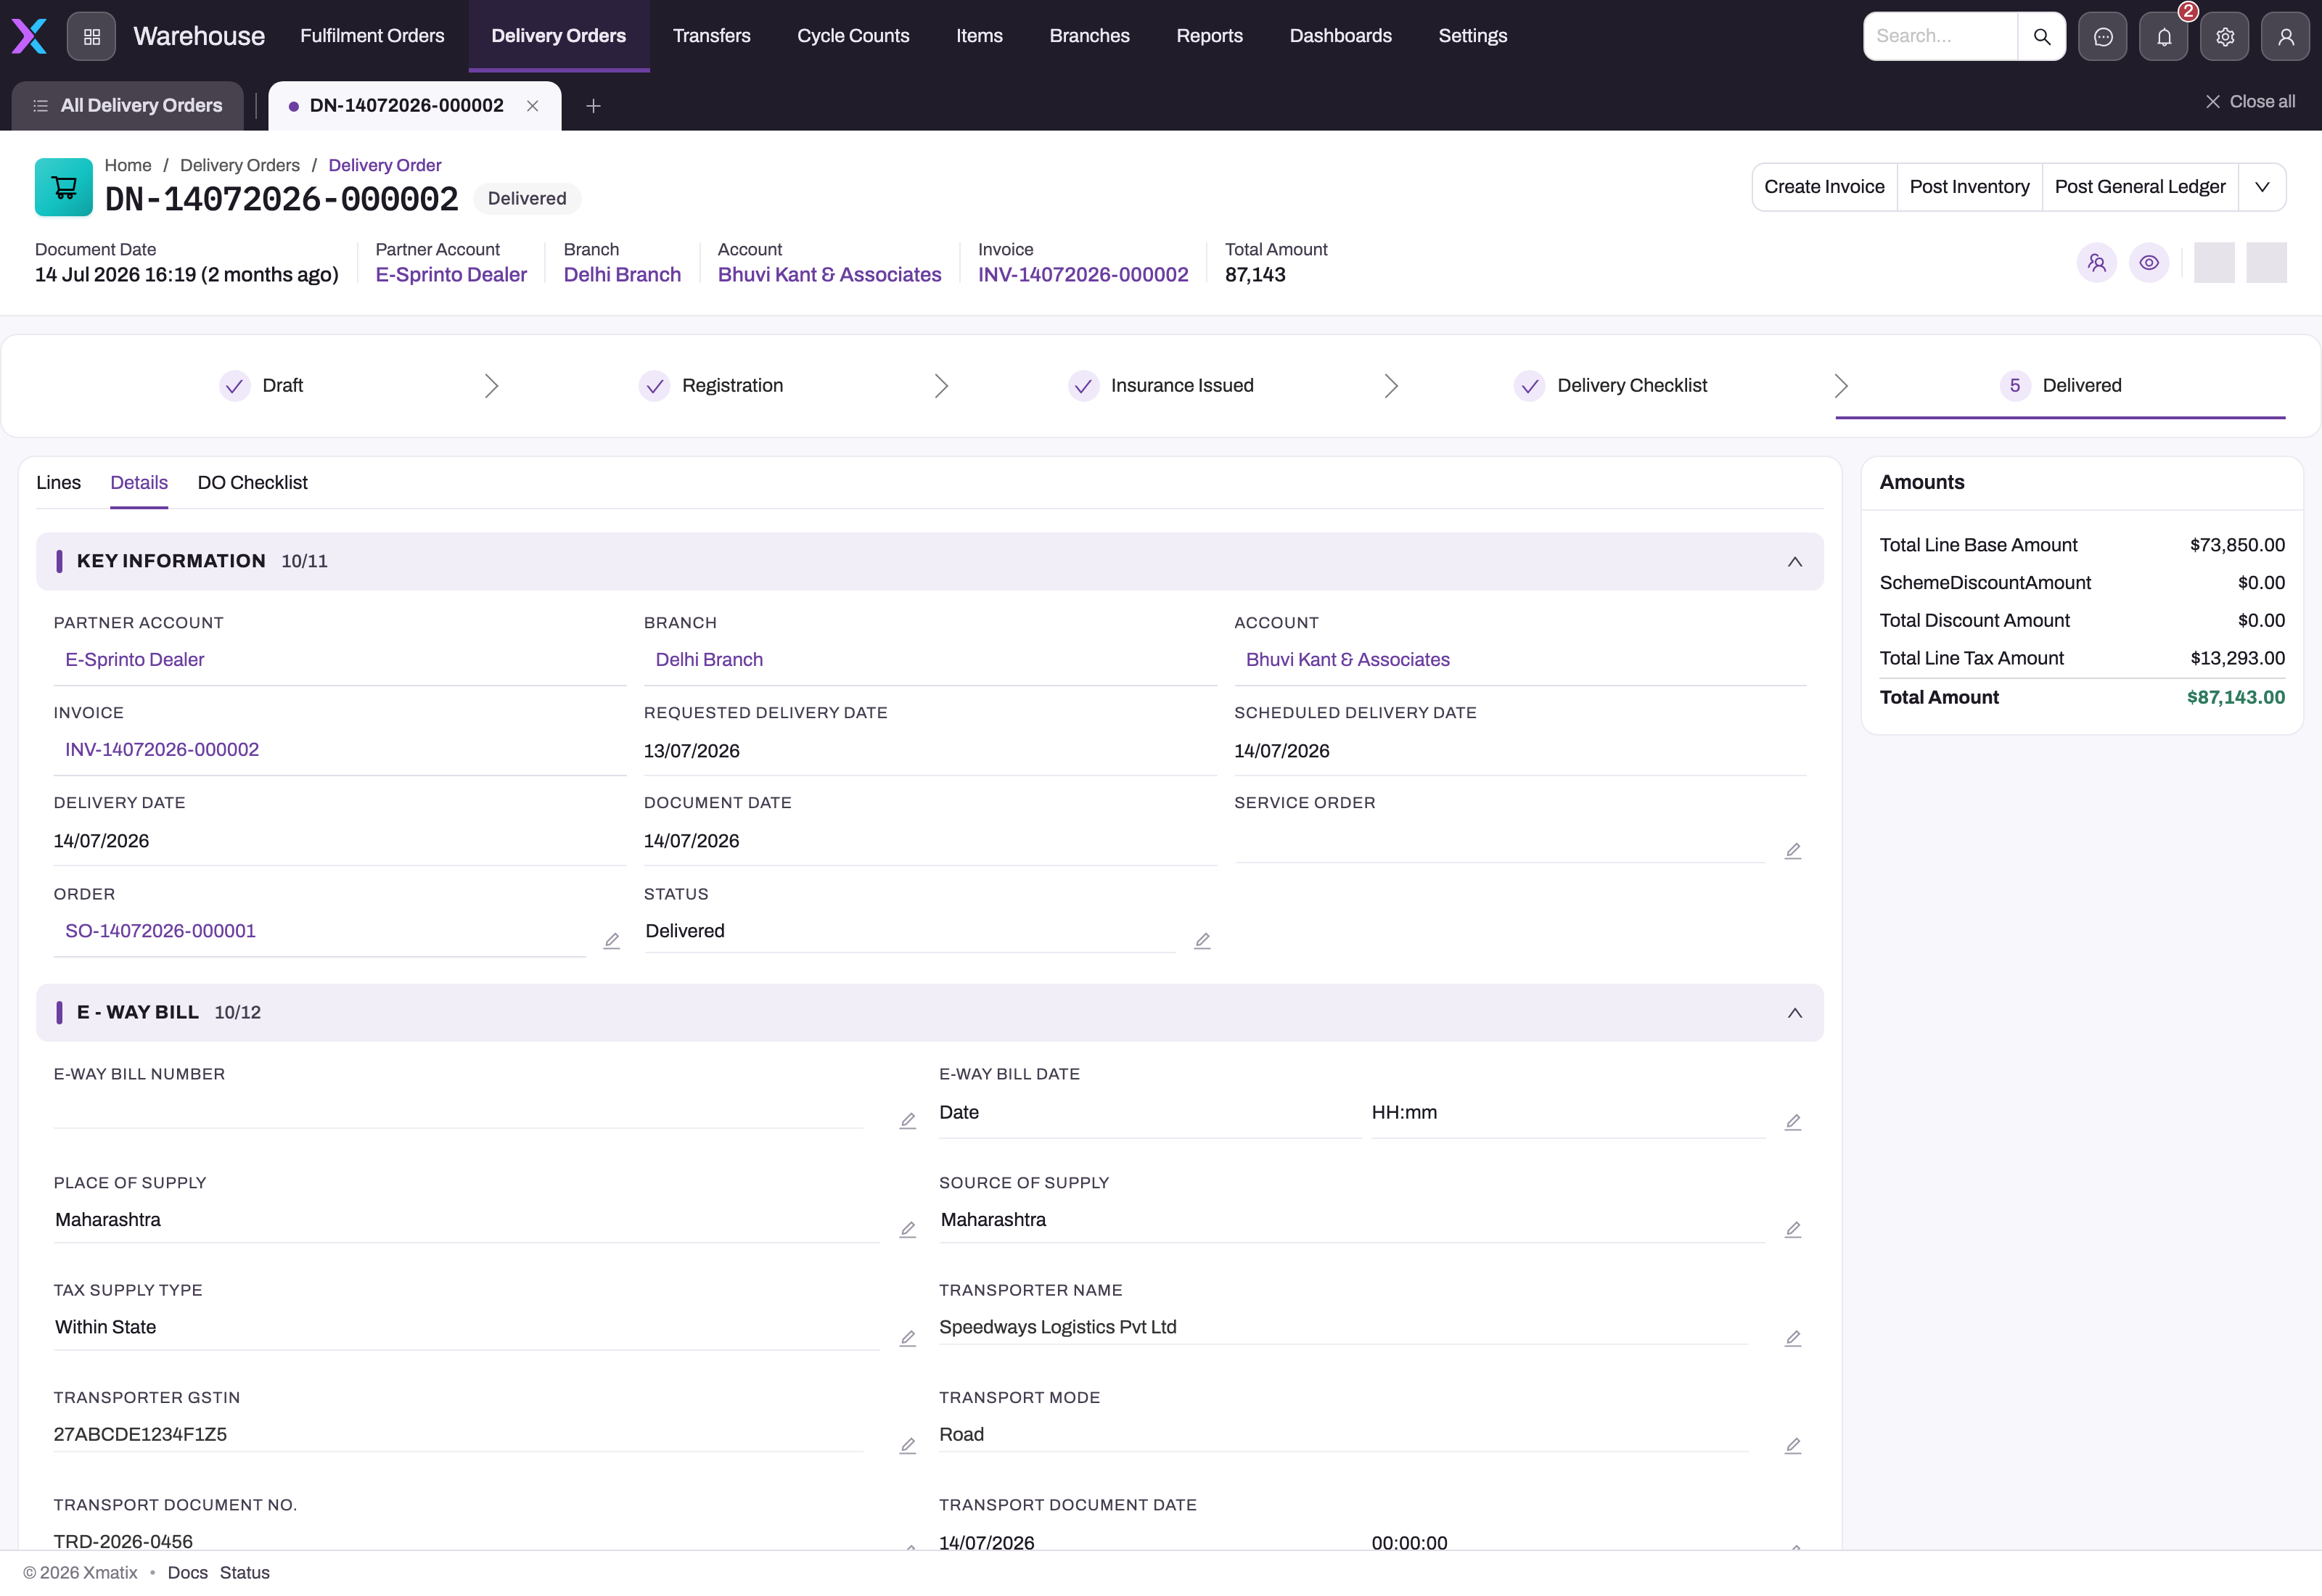
Fill the transport fields in the E-Way Bill section of the Details tab: transporter name and GSTIN, transport mode (Road, Air, Railway or Ship), vehicle number, and the transport document number and date (or the LR date) your process uses. Place of supply, source of supply and tax supply type sit alongside them because they decide how the invoice is taxed. In India, the E-Way Bill action and the e-way bill number and date fields cover the statutory side, and Print DO produces the papers that ride with the goods.
- 1
Header actions: Create Invoice, Post Inventory and Post General Ledger; the arrow opens the remaining actions (Populate Checklist, Release Shipment, E-Way Bill).
- 2
The stage bar shows the status pipeline configured for your tenant; the record's own flags, not this label, prove what has posted.
- 3
Requested, Scheduled and Delivery Date are separate fields so promise, plan and performance stay comparable.
- 4
Order and Invoice link the delivery to its source and to the invoice created from it.
- 5
E-Way Bill section: number and date, place and source of supply, tax supply type, transporter name and GSTIN, transport mode and the transport document reference.
- 6
Amounts are computed from the lines — base, discounts, tax and total — because the delivery order can be the basis of the invoice.
The Details tab consolidates source, account, branch, delivery and billing addresses, requested, scheduled and actual dates, pricing controls and tax context. Use it as the final header check immediately before consequential dispatch actions.
Step 4 — Release the shipment
Run Perform Release Shipment (or Selective Release Shipment for chosen lines and quantities). It creates a shipment document — named SHP- plus the delivery order's number, with one line per released delivery line — for the receiving party: a customer that is itself a branch in xMatix, typically another company of your organization. The receiver then releases their goods receipt from that shipment, so the consignment is tracked end to end. The action requires lines with quantity, and a branch linked to the customer account — without one it fails with No branch found for account … to create shipment.
Step 5 — Create the invoice
Run Create Invoice to build the invoice from the delivery order's lines that still have pending invoice quantity. Lines already invoiced are skipped, so partial invoicing across several runs is safe. From here the document continues in invoicing and payments.
Step 6 — Posting
Perform Inventory Posting posts the delivery's stock movements to the inventory ledger, and Perform GL Posting records the accounting entries. Depending on how the delivery order was created, inventory effects may already have posted through the fulfilment's lines — the ledger is the authority on what actually moved.
Expected result
The delivery order contains the correct receiving account, source lines, lots, quantities, addresses, delivery responsibility and planned dates, plus completed checklist and transport evidence required by your process. Releasing to an xMatix receiving branch creates a linked shipment with matching releasable quantities; invoicing creates only the remaining uninvoiced quantities, so repeated partial runs never duplicate completed lines. Inventory and general-ledger posting actions leave auditable entries against the delivery, while the inventory ledger remains the definitive evidence of what moved and when. Before closing dispatch, confirm that delivered quantities, shipment or external-customer path, invoice state and posting state all agree rather than relying on the document status alone.
Common problems
- At least one Delivery Order Line with quantity greater than zero is required to create Shipment. The document has no releasable lines — check quantities.
- No branch found for account … to create shipment. Release Shipment needs the customer account linked to a branch. For ordinary customer deliveries that don't receive in xMatix, dispatch on the delivery order itself — the shipment document is not required.
- No pending invoice quantities found in delivery order lines to create invoice. Every line is fully invoiced already.
- No Delivery Order Lines found for Inventory Posting. There is nothing for the posting action to post — the document has no eligible lines.
- Populate Checklist produces nothing. No delivery checklist template is defined — an administrator must create one first.
Common questions
Is there a separate packing document?
No. The delivery order is created directly from picked (or allocated) lines and is itself the dispatch paper — xMatix has no packing step between the pick and the delivery. Pre-dispatch checks belong on the delivery checklist, which is exactly what Populate Checklist exists for.
When do I need Release Shipment?
Only when the receiving party receives in xMatix — inter-company and branch-to-customer-branch deliveries. The shipment document is what the receiver releases their goods receipt from. A delivery to an outside customer needs no shipment: the delivery order, its checklist and its transport details are the complete dispatch record.
Invoice from the delivery, or delivery from the invoice?
Both paths exist and end in the same documents. Warehouse-led operations deliver first and run Create Invoice from the delivery order; counter-style operations invoice first and release the delivery from the invoice. Pick one as your standard so pending-quantity fields keep their meaning across the team.