
Most operational documents create journals through their posting handlers. Manual journals cover opening balances, accruals, corrections and reclassifications. Posting requires balanced debit and credit lines and an Open period. Posted lines are guarded against editing; use reversal for corrections rather than changing ledger history.
Find and verify an existing journal
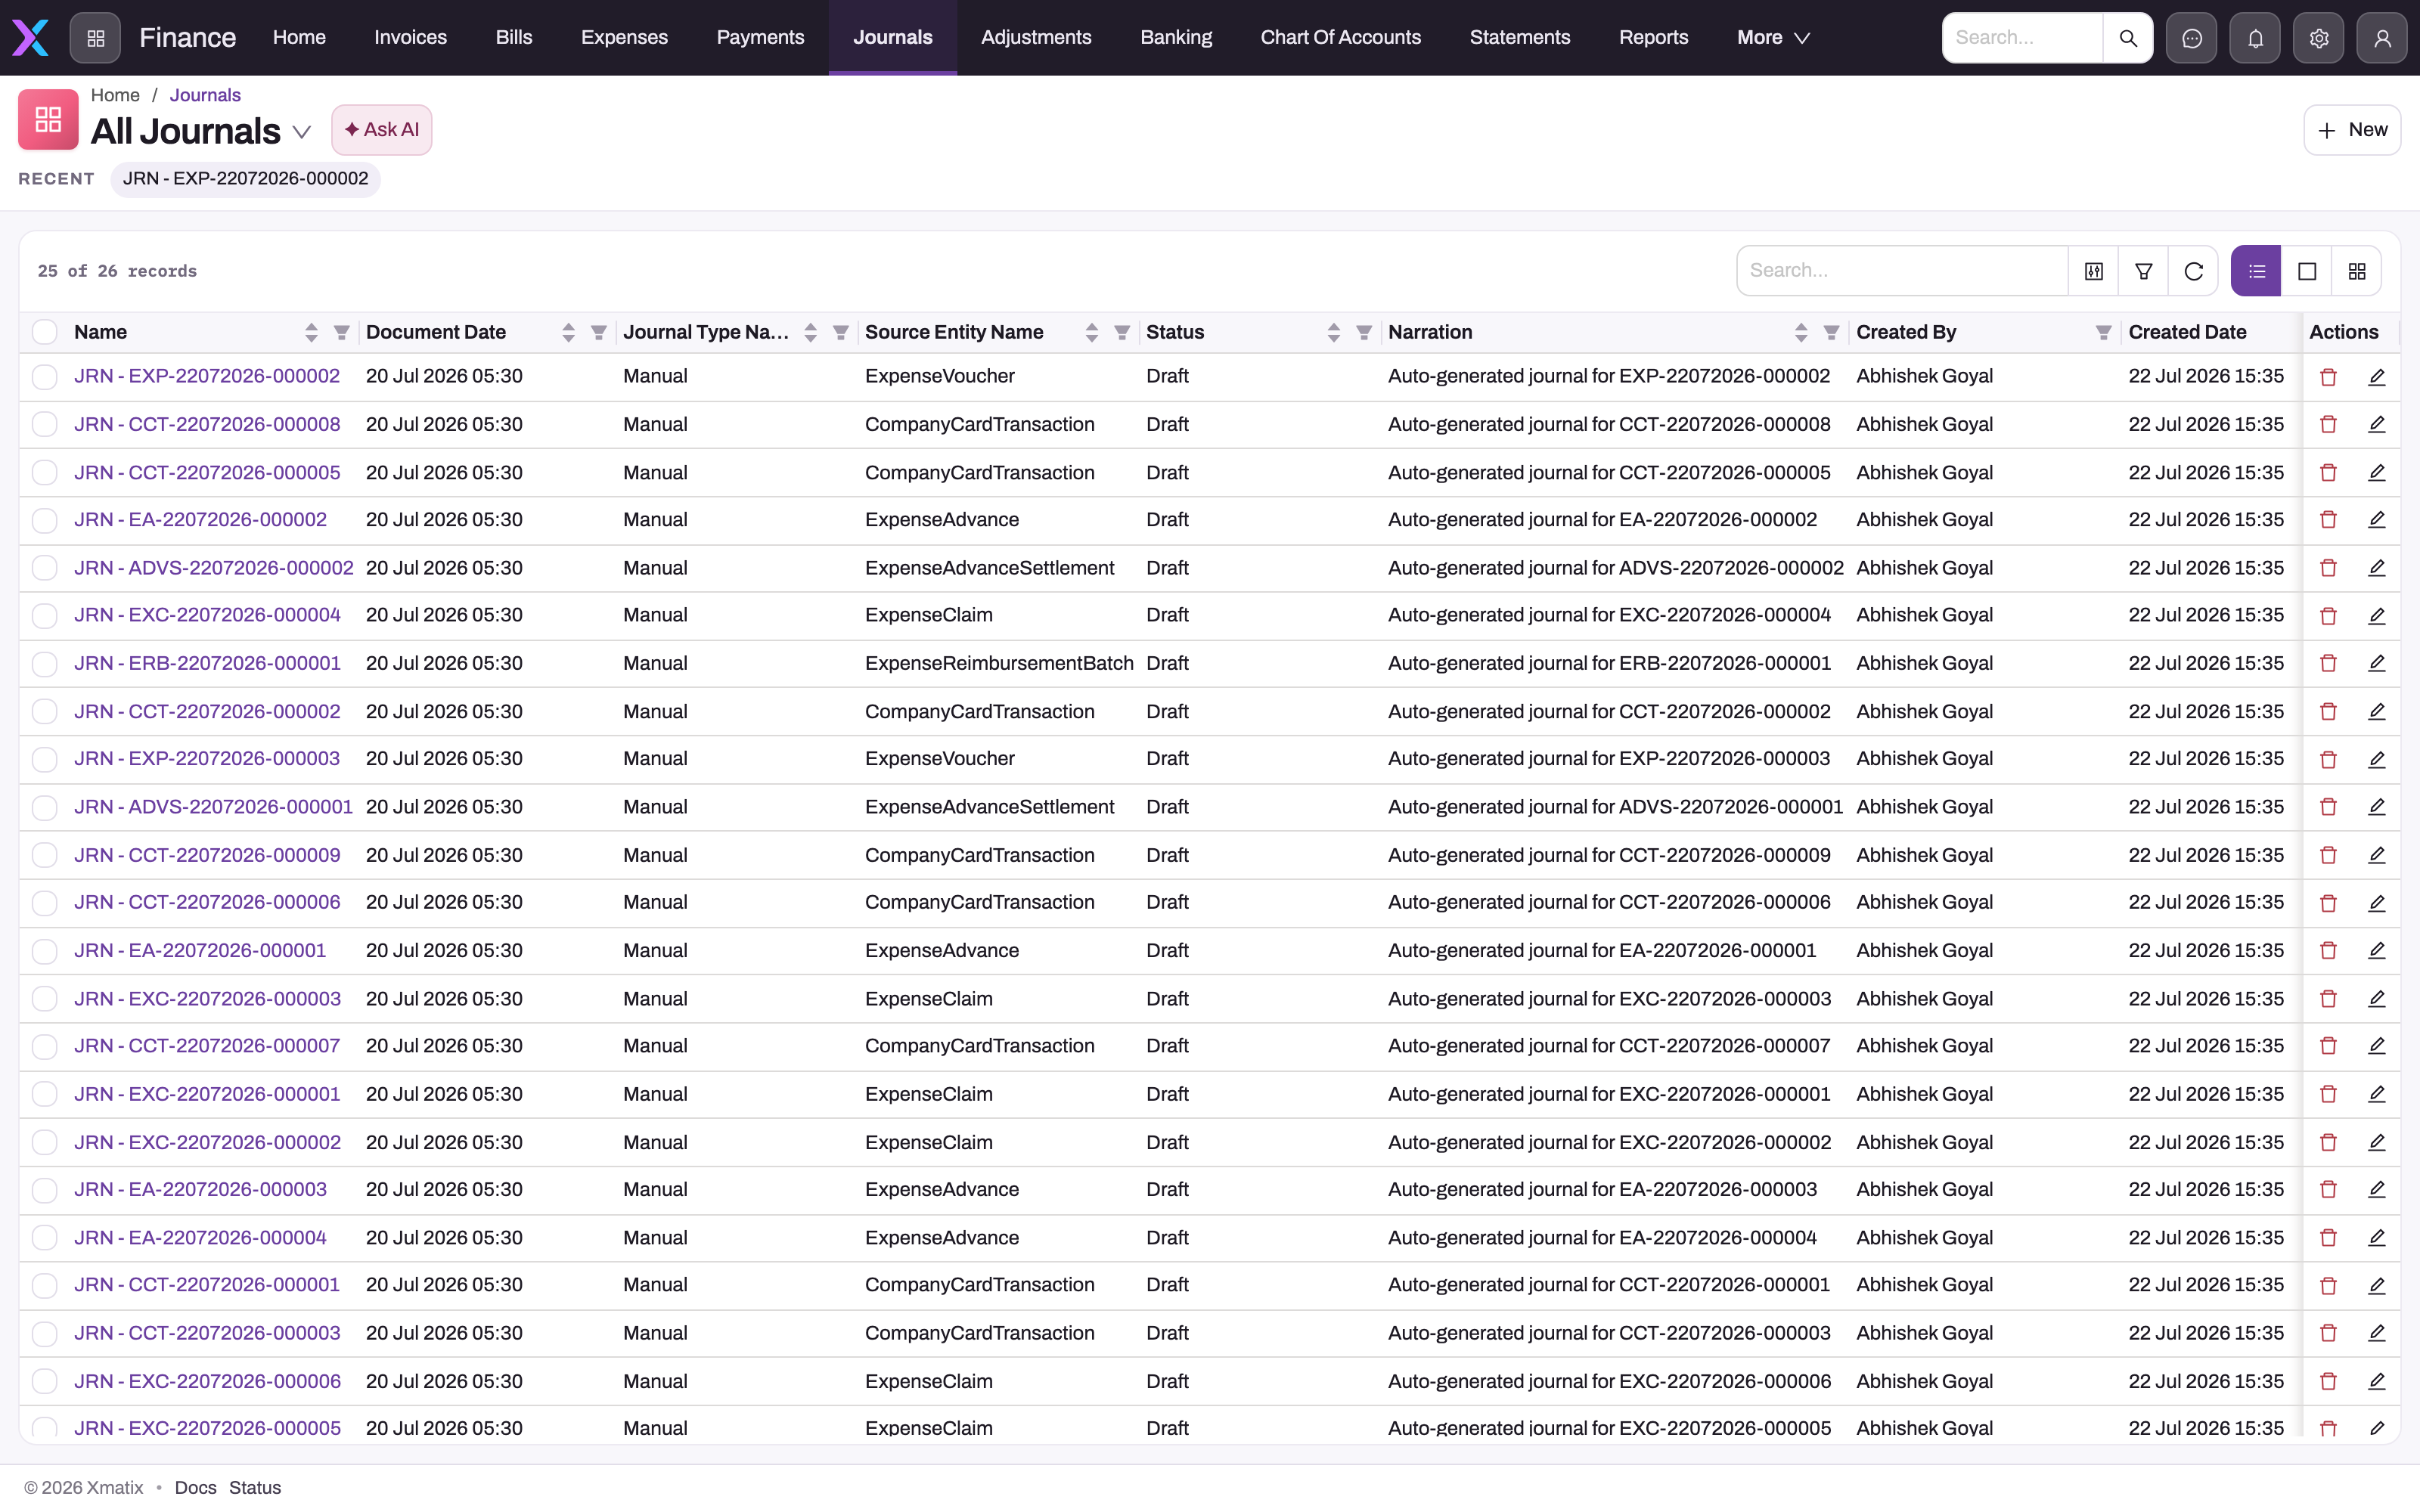
- 1
Open a journal by its generated name to inspect the lines and source record.
- 2
Document Date is the business date used when the fiscal period is resolved at posting.
- 3
Manual appears on these document-generated drafts, so it is not a provenance test by itself.
- 4
Source Entity Name identifies the originating business-document type when it is supplied.
- 5
Status distinguishes drafts from journals that have actually posted.
The list is the safest starting point because it exposes document date, status, source entity and narration together. In the example, rows with Journal Type Name = Manual also say Auto-generated journal and identify an expense source. That is why journal type must not be used as the sole test of manual entry. Open the source-linked record when provenance matters.
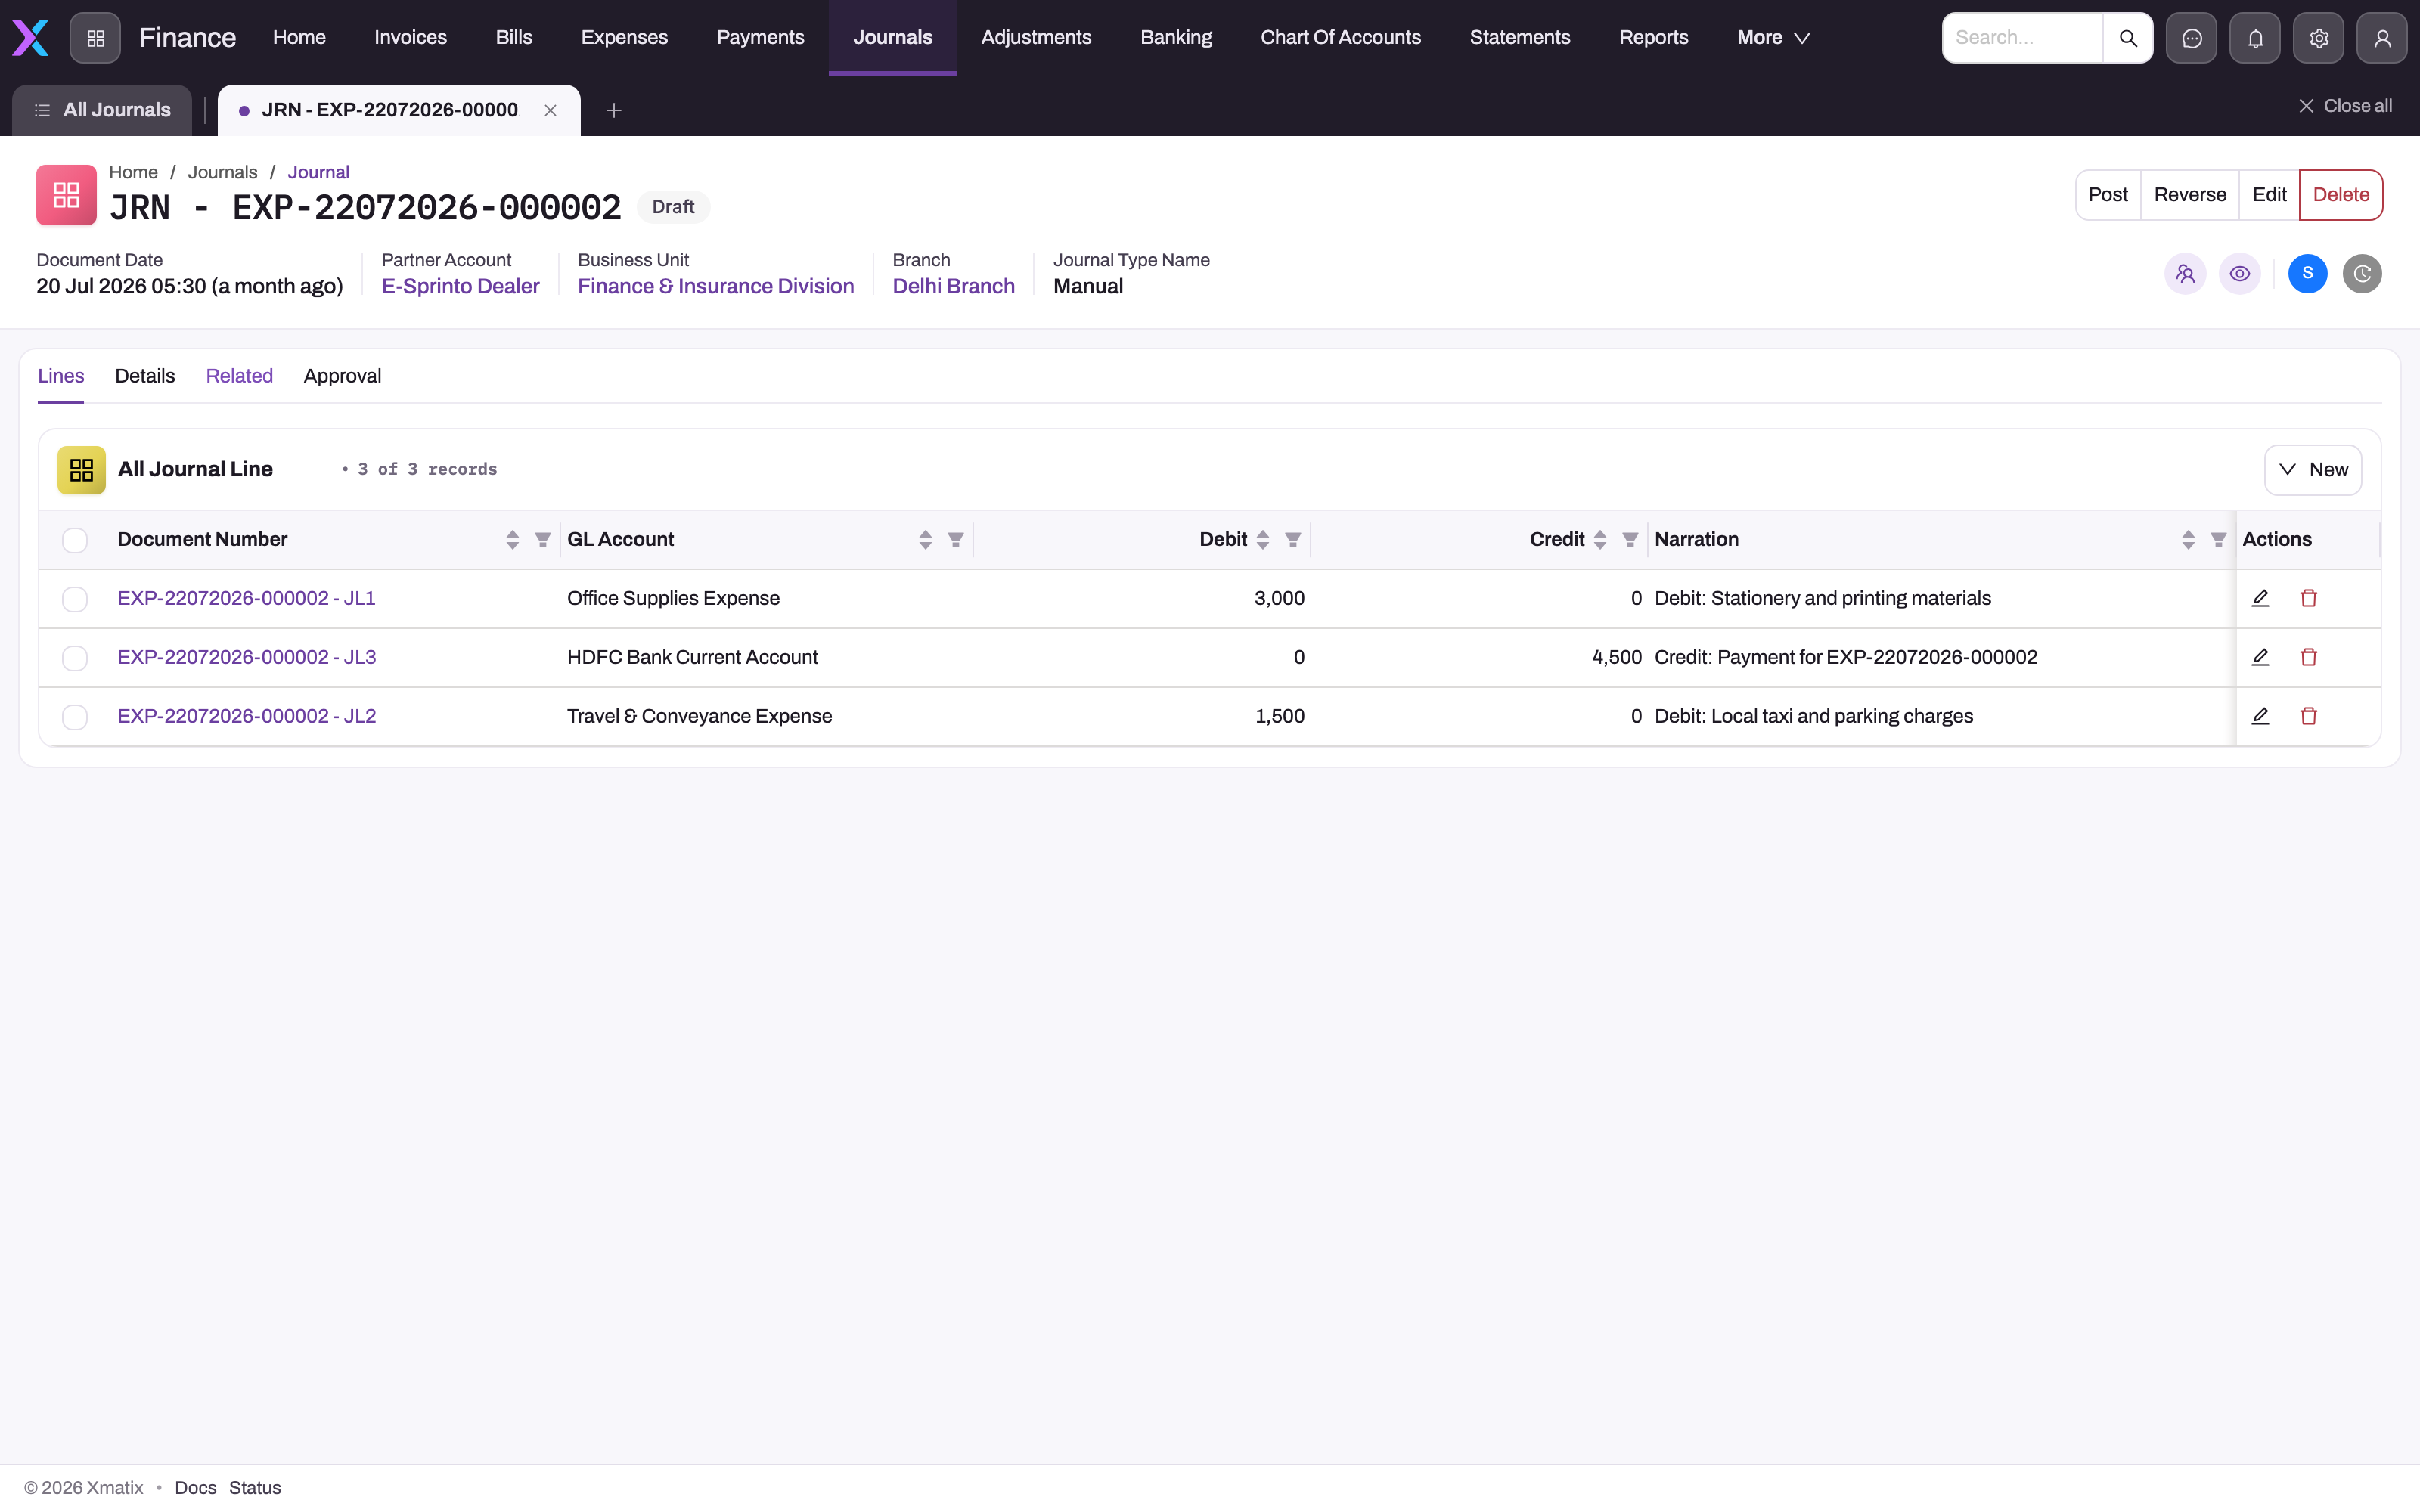
- 1
The header identifies the source company, branch, document date and current Draft status.
- 2
Lines is selected; empty or unrelated tabs are not used as accounting evidence.
- 3
Every line names the GL account receiving the debit or credit.
- 4
Visible debits total 4,500 and the visible credit totals 4,500.
- 5
Narration explains the business purpose of each posting leg.
The Lines tab is the accounting evidence. Read every GL account, debit, credit and narration, then independently total each side. The populated draft shown here has two expense debits of 3,000 and 1,500 and one bank credit of 4,500, so the visible lines balance before posting.
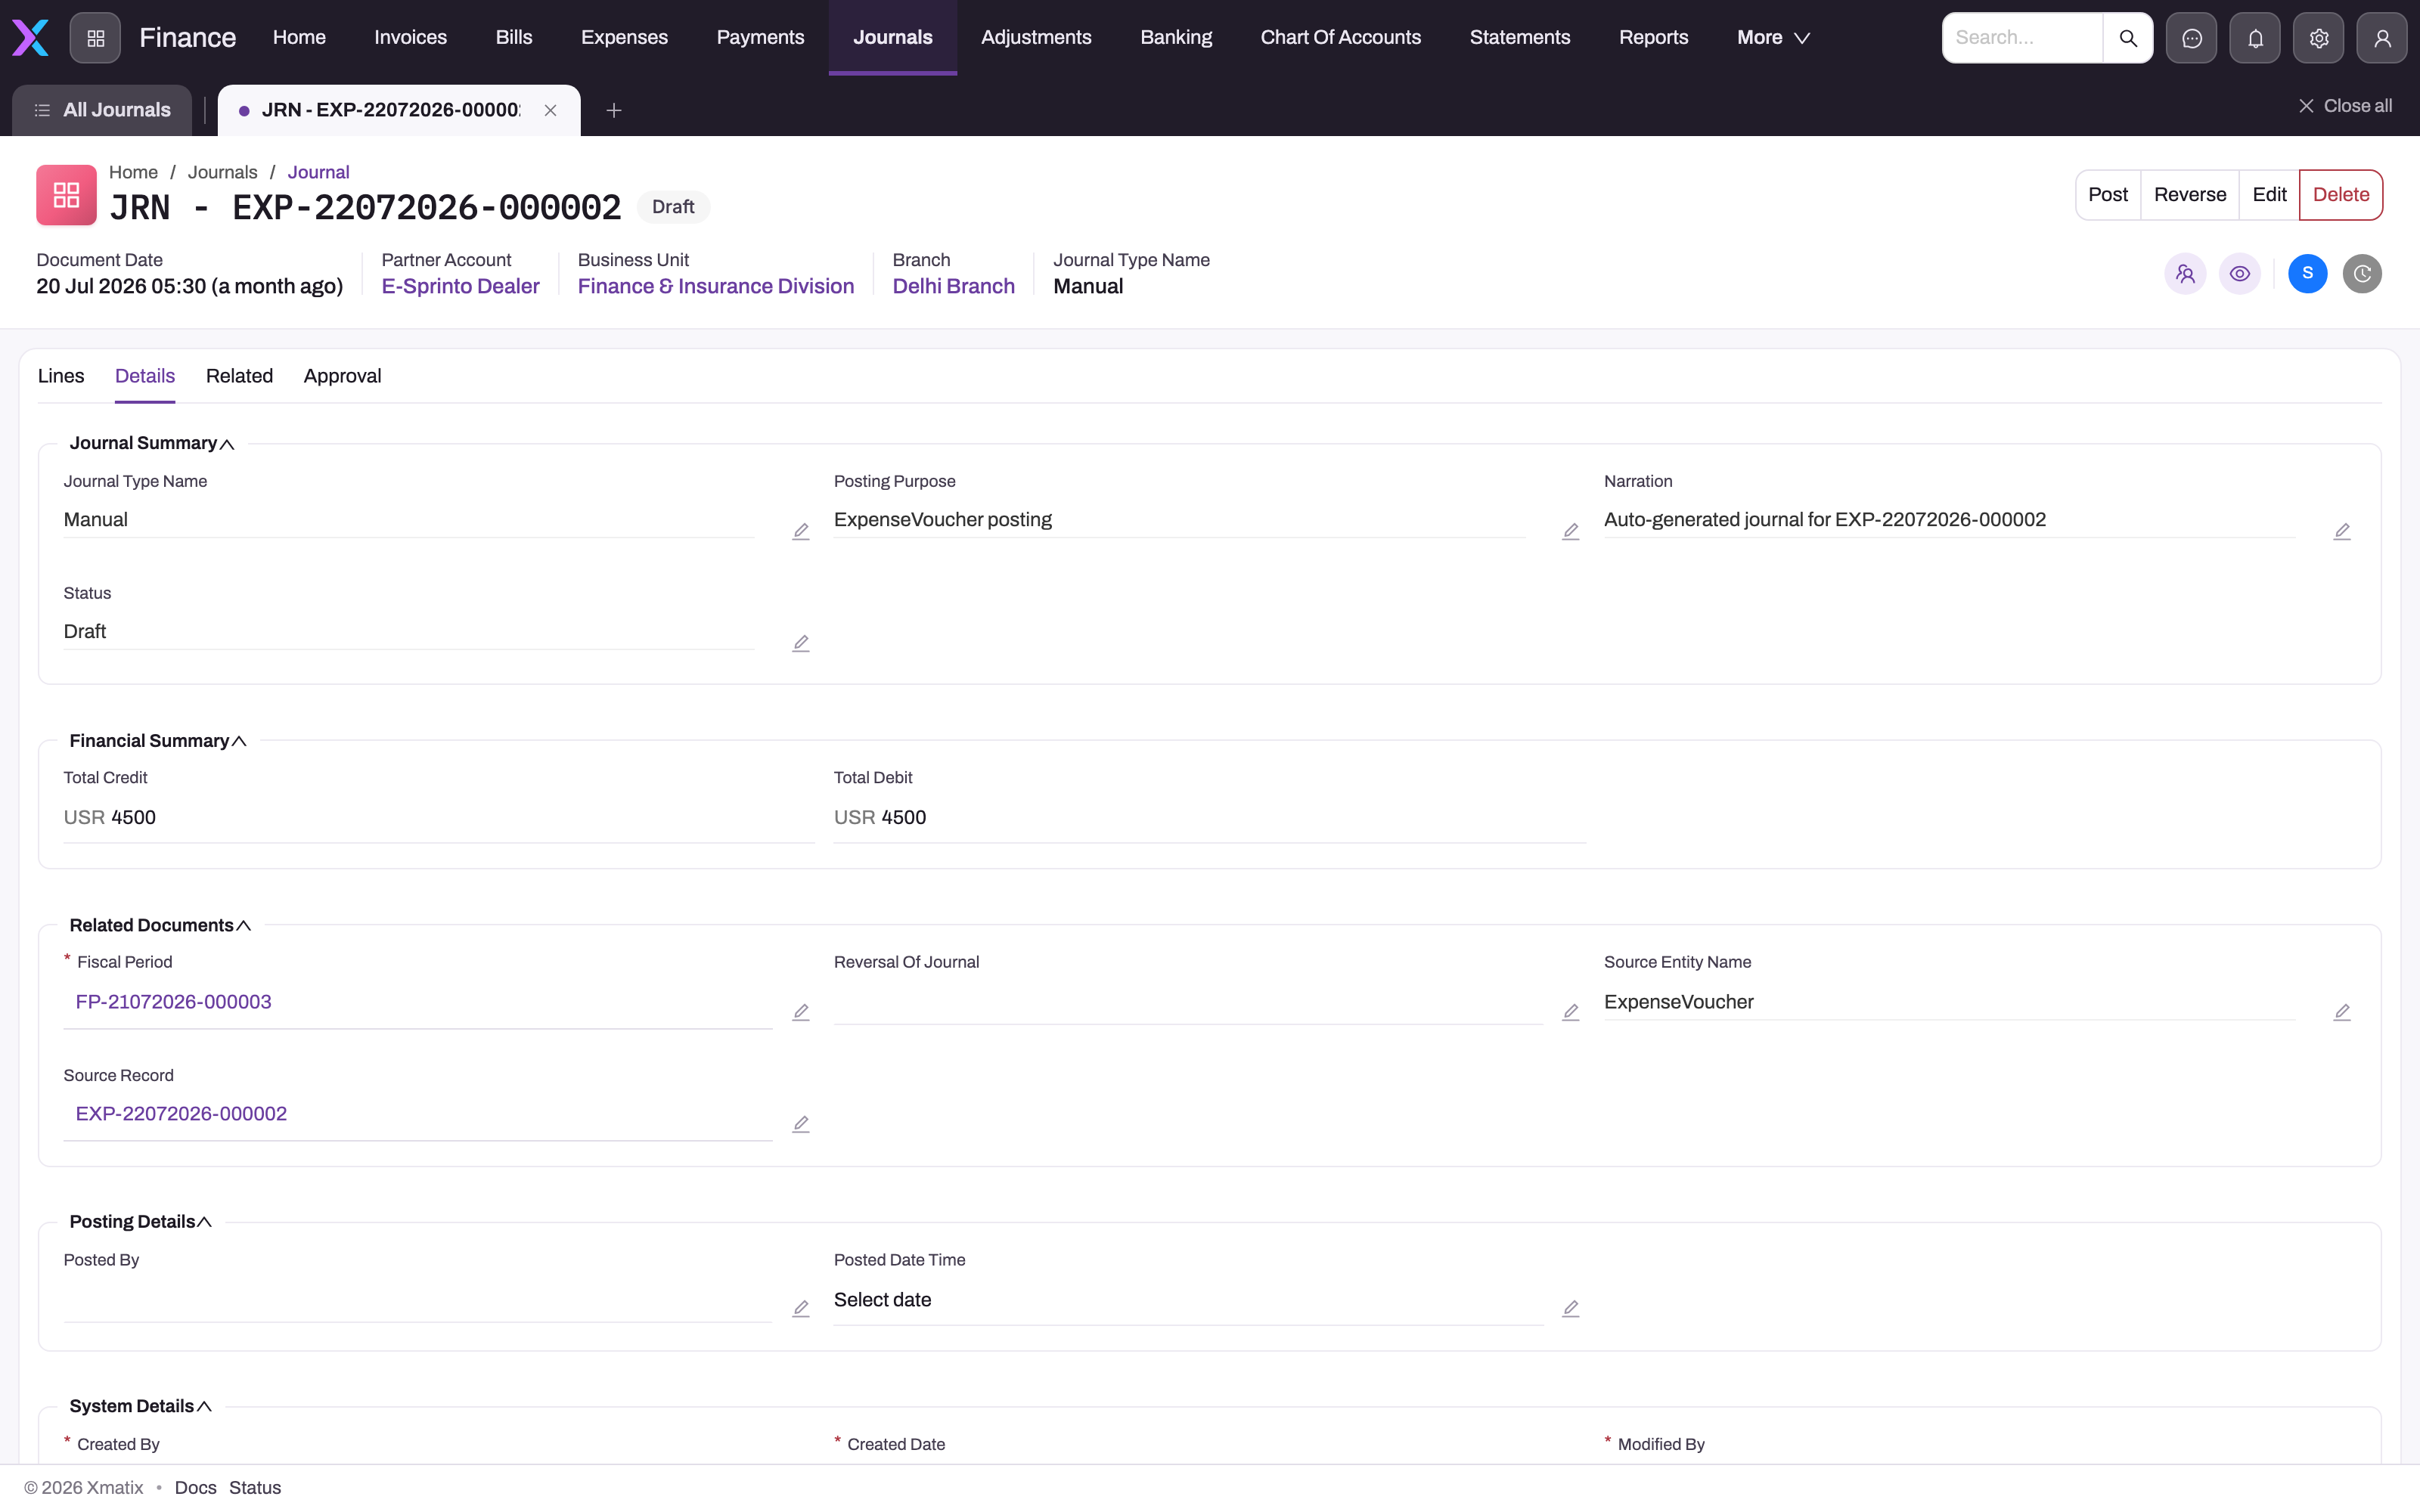
- 1
The summary records Manual as the type but also identifies an ExpenseVoucher posting purpose.
- 2
Total Debit and Total Credit both show 4,500 for this saved draft.
- 3
Fiscal Period is the resolved period reference displayed on the journal.
- 4
Source Entity Name identifies the source record type.
- 5
Source Record links the journal back to the expense voucher that produced it.
The Details tab explains the header and source relationship. Its financial summary agrees at 4,500 on each side, while Source Entity Name and Source Record lead back to the expense voucher. The record is still Draft, so blank posting fields are expected and this image must not be read as proof that the journal reached the ledger.
Prerequisites
- Finance access that includes journals — granted through your security profile.
- An Open fiscal period covering the journal date (see the fiscal calendar).
- The GL accounts you intend to post to.
Procedure
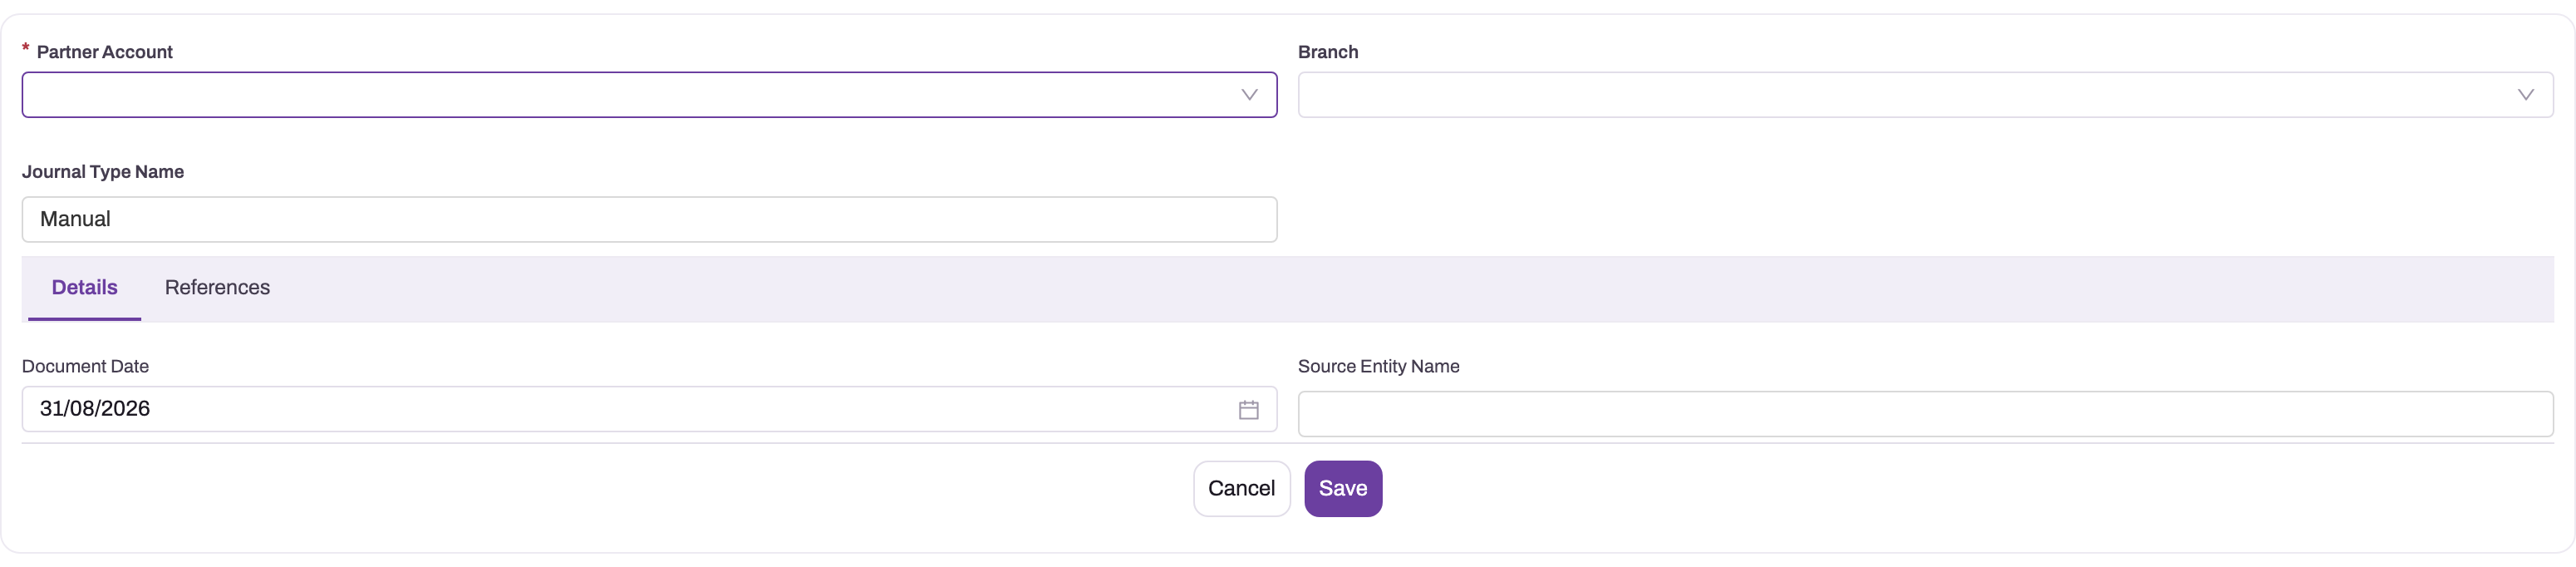
- 1
Partner Account is required and determines which organization's ledger receives the journal.
- 2
Branch is the optional branch dimension shown on this header layout.
- 3
Journal Type Name defaults to Manual on a user-created journal.
- 4
Document Date determines which fiscal period posting validation will inspect.
- 5
Source Entity Name is system provenance, not a free-form human reference. The References tab holds system document links after creation.
Step 1 — Create the journal
In the Finance app open Journals and create a new journal. Select the required Partner Account, optional Branch and a Document Date inside the fiscal period you intend to affect. Journal Type Name defaults to Manual. The create layout does not ask for a human-entered journal name or reference; the platform generates the journal identity. Source Entity Name and the References tab are system provenance, not a replacement for an external evidence reference. Save the Draft header, reopen it and verify the generated identity, organization and date before adding lines.
Step 2 — Add balanced lines
Add one line per account movement with the GL account, either a debit or credit amount, and a narration that explains the business reason. Stamp branch and business unit where applicable; statement dimension filters work only when postings carry those dimensions. A control-account line must name its customer or supplier. Before posting, compare debit and credit totals, scan for reversed signs or duplicate lines, and confirm the displayed difference is zero.
Step 3 — Post it
Use Post only after a second-person review where your control process requires one. Wait for the status to change from Draft to Posted, then reopen the journal and verify its number, fiscal period, totals, posting timestamp and line dimensions. The posting service updates period and account balances in the same unit of work. If posting is refused, correct the named cause—fewer than two lines, an invalid debit/credit side, unbalanced totals, an inactive or missing GL account, a non-open period or a control-account line without a party—and retry the same draft instead of creating another journal.
Step 4 — Correct with a reversal
Open the posted journal and choose Reverse, supply the reversal date and reason, and confirm the date falls in the period where the correction should land. The system posts a linked mirror journal—every debit becomes a credit and vice versa—while retaining the original. Verify the two journals link to each other and net to zero, then create a fresh journal if the correct transaction still needs posting. Never compensate by editing history or by entering an unlinked opposite journal.
Step 5 — Set up recurring journals
For a repeated entry such as rent accrual or a standing allocation, create a recurring journal template with balanced lines, cadence, next run date and optional end date. Materialization is currently driven by the scheduler; there is no first-party on-demand “run now” journal action. After the scheduled run, confirm the expected journal was created once, its date is in an Open period and the template's next-run date advanced.
Expected result
The manual journal posts once with balanced lines into the intended Open period. Corrections appear as linked reversals. Recurring templates create journals only when the scheduler processes them, so monitor both generated output and next-run state.
Common problems
The journal will not post. Check the three gates in order: debits equal credits, the journal date falls in an Open period, and every control-account line names a party. The error message tells you which gate failed.
It posted to the wrong period. The period comes from the journal date. Reverse the journal, then re-enter it dated inside the period you intended — assuming that period is still open.
A recurring journal did not appear. Check the template is active and its next run date has arrived. A template whose next run date is in the future has simply not come due.
Common questions
Can I edit or delete a posted journal?
Posted journal lines are protected and the supported accounting correction is a linked reversal. The current header guard is narrower: it rejects changing the status of a posted journal but does not comprehensively reject every other header-field edit at the handler layer. Operational permissions and layouts should therefore keep posted headers read-only as well; do not interpret the backend line guard as blanket header immutability.
Which period does a journal land in?
The period containing its journal date, validated against the fiscal calendar at posting time. Entering a journal today with last month's date posts it into last month — provided that period is still open. This is the same rule documents follow, so a backdated invoice and a backdated journal behave identically.