
This walk-through takes one external system from nothing to a working integration: an app to own it, a secret for its credential, a tested connection, an entity binding, an activated flow, and a first verified run. The same skeleton underlies every integration — including sync profiles, which generate the flow part for you.
Prerequisites
- The integration administration capability, which gates Setup → Process Studio → Integrations. Creating an app needs only the capability; everything inside an app also needs a role on that app (creation grants you Admin automatically).
- Credentials for the external system — an API key, token, or OAuth client details, depending on the connector.
- The name of the xMatix entity you will read from or write to.
Procedure
Step 1 — Create the integration app
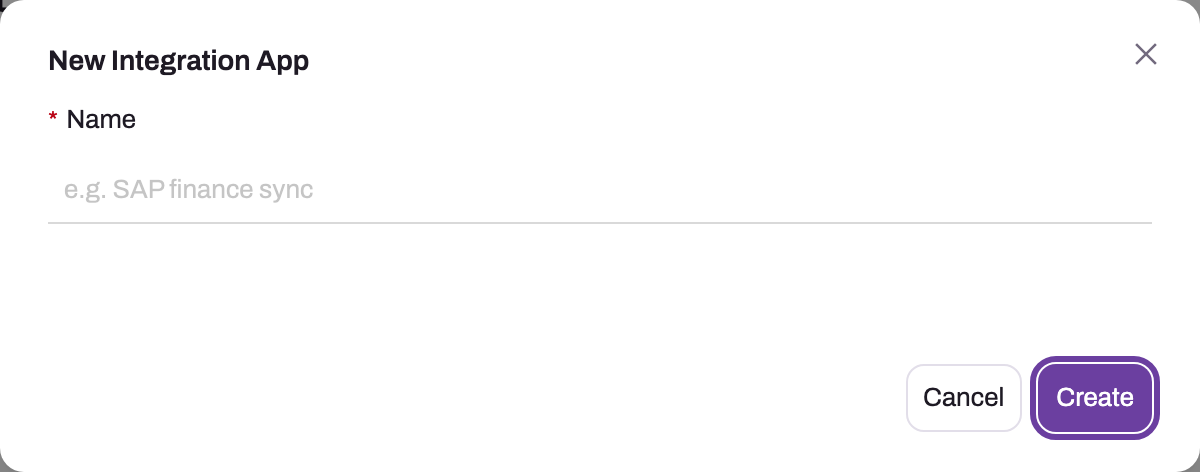
Go to Setup → Process Studio → Integrations and select New. The creation dialog deliberately asks for one field: Name. New apps are Active by default; Active appears when editing the saved app. The API also creates a public id and grants Admin to SystemAdmin plus the caller's resolved security profiles. Give the app a name that identifies the external system and business purpose without embedding a credential.
- 1
New Integration App opens from New on Setup → Process Studio → Integrations; the app is the scope that owns connections, secrets, bindings, flows, triggers and members.
- 2
Name is the only creation field. Identify the external system and business purpose; never embed a credential or hostname secret.
- 3
Create writes the app, marks it Active and grants Admin to SystemAdmin and your own security profiles; the Connections, Secrets, Bindings, Flows and Triggers tabs appear afterwards.
- 4
Cancel closes the dialog without creating anything.
The New Integration App dialog above is the whole creation contract: one required Name. Connections, Secrets, Bindings, Flows, Triggers and Members become tabs of the saved app only after the container exists, and the app's Active flag (on by default) can be turned off later to stop every run it owns without deleting anything.
Step 2 — Store the credential as a secret
Open the app's Secrets tab and select Add Secret. Give it a reference name (for example partner-token) and paste the value. Secrets are write-only: the value is encrypted, never shown again and never returned by any screen or API. Everywhere else you use the reference — ${secret:partner-token} — instead of the value. Details and rotation are covered in credentials and rotation.
Step 3 — Create and test the connection
On the Connections tab select New Connection, pick the connector type, and fill in its form — each connector declares its own fields, so a catalog connector shows exactly the inputs it needs, while the generic HTTP/REST connector takes a URL plus headers where you can reference your secret. Then select Test Connection.
Read the test result for what it actually proves. Credentialed connectors (Salesforce, Zoho) fail the test on bad credentials. The generic HTTP/REST connector counts any non-server-error response as reachable — a 401 or 403 still "passes" — so check the returned status in the details before moving on.
Step 4 — Bind the entity
On the Bindings tab, declare which xMatix entity this integration touches and how: direction (Inbound, Outbound or Bidirectional), and write mode (Create, Update or Upsert). Upsert with an external key is what makes re-runs safe — the same external record updates the same xMatix record instead of duplicating it. Bindings can also require approval and staging for inbound data you want reviewed before it is written.
Step 5 — Build the flow and preview it
On the Flows tab, create a flow against the binding and give it a draft version. A flow is a step graph—typically source, transform and sink. Preview validates the graph, supplies your sample input to source nodes, executes supported pure transforms, and records sink nodes with the input they would receive without executing them. Connector and entity I/O does not occur. Lookup and script preview currently behave as pass-through/no-op transforms, so a successful preview proves graph shape and mapping behavior, not external reachability or full runtime semantics.
Step 6 — Activate the version
Activate the draft. Activation re-validates the graph, deactivates any previously active version (one active version per flow), and freezes the version — an active version is immutable, so later fixes are made in a new draft. This is what makes rollback and "what exactly ran that night" answerable.
Step 7 — Trigger it and verify
On the Triggers tab, create a trigger for the flow. For a first smoke test use a Manual trigger and fire it with a small payload; for production, use a schedule (see scheduled sync) or an entity-event trigger (see outbound integration). Then open the app's Overview and confirm the run reached Succeeded — and check the records themselves, in xMatix or in the external system, because that is the claim being tested.
Expected result: the connection test returns the expected status, the active flow run reaches Succeeded, and the intended record appears or changes in the destination system.
Common problems
- 403 opening the app even though you can see the Integrations list. Listing apps needs only the capability; everything inside an app needs role membership. Ask an app Admin to grant your security profile a role on the Members tab.
- The preview looked right but the real run failed. Previews execute transforms only. Credentials, reachability and the external system's validation are exercised only by the connection test and a real run — treat the first live run as part of setup.
- Nulls after the mapping step. The transform's source paths do not match the incoming payload shape. Preview the draft with a captured real payload and fix the paths; for connector reads, also confirm the response's record collection is being extracted rather than the whole envelope.
- Firing a trigger returns "Trigger is paused". The trigger has its active flag off. Triggers, flows and the app each have independent active flags; all must be on for a run to dispatch.
Common questions
Where do the credentials actually live?
In the app's secret store, encrypted, bound to that app, and write-only from the moment they are saved. Connections and flow steps hold only ${secret:...} references, which are resolved at execution time — so exporting or inspecting configuration never exposes a credential, and rotating a key is an in-place update with no configuration edits.
Do I have to build the flow by hand?
Only for bespoke shapes. If the goal is "keep these entities in step with that system", create a sync profile instead: it discovers the external objects, suggests field mappings, and compiles the flows itself. Hand-authored flows are for everything else — one-way pushes with custom payloads, staged imports with approval, queue and file transports.
Can inbound data be reviewed before it lands?
Yes. Set the binding to require approval (optionally with staging). Inbound runs then park as pending approval with the incoming records visible on the app's Staging tab; an Operator approves or rejects on the Approvals tab, and approval can automatically re-dispatch the parked run so the records are written without re-fetching anything.